Browserless
Browserless Web Scraping: NodeJs in Puppeteer
Headlesschrome is important in web scraping. This article is talking about the most detailed steps to do web scraping with headlesschrome and Puppeteer.
Aug 07, 2024Carlos Rivera
What Is Headlesschrome?
Headless? Yes, that means this browser has no graphical user interface (GUI). Instead of using a mouse or touch device to interact with visual elements, you use a command line interface (CLI) to perform automation.
Headlesschrome and Puppeteer
Many web scraping tools are available for headlesschrome, and headlesschrome usually takes away a lot of headaches.
You must also like: How to detect and anti-detect a headlesschrome?
What is Puppeteer? It is a Node.js library that provides a high-level API to control headlesschrome or Chromium or interact with the DevTools Protocol.
Today we will explore headlesschrome in depth with Puppeteer.
What Are the Advantages of Using Puppeteer for Web Scraping?
As you can imagine, there are several big advantages to using Puppeteer for web scraping:
- Puppeteer scraping tools enable dynamic data extraction because headlesschrome can render JavaScript, images, etc. just like regular web browsers.
- Puppeteer web scraping scripts are harder to detect and block. Since the connection configuration looks like that of a normal user, it is difficult to identify it as automated.
How to Do Web Scraping with Puppeteer and Node.JS?
In the following example, we will perform basic web scraping to help you quickly get started with Puppeteer. The page we chose to crawl is the review section of Amazon's Apple AirPods Pro.
But don't worry, before that, we still need some preparation:
Install and configure the Puppeteer
- Step 1. Please make sure you have installed Node.js.
If not, please install Node.js (LST) directly, and then install Puppeteer through Nodejs's package manager npm. This process may be a bit long because Puppeteer also needs to install the corresponding Chrome.
Bash
npm i puppeteer- Step 2. After installation, you can run the following demo to ensure that your installation is correct.
You can also use this demo to get a general understanding of Puppeteer. Don't get stuck here, because we will introduce the usage of Puppeteer and related scenarios in detail later.
Puppeteer is headless enabled by default. Here, headless is turned off through puppeteer.launch({ headless: false }) to let you see the crawling process.
JavaScript
import puppeteer from 'puppeteer';
// Launch your browser and open a new tab
const browser = await puppeteer.launch({ headless: false });
const page = await browser.newPage();
// Navigate to a specified URL
await page.goto('https://developer.chrome.com/');
// Set the screen size
await page.setViewport({width: 1080, height: 1024});
// Locate the search box element and enter the content in the search box
await page.locator('.devsite-search-field').fill('automate beyond recorder');
// Wait and click the first search result
await page.locator('.devsite-result-item-link').click();
// Locate the full title using a unique string
const textSelector = await page
  .locator('text/Customize and automate')
  .waitHandle();
const fullTitle = await textSelector?.evaluate(el => el.textContent);
// Print the full title
console.log('The title of this blog post is "%s".', fullTitle);
// Close the browser instance
await browser.close();
Puppeteer is a promise asynchronous library that runs through async await, which can present its functions very intuitively. The above demo and subsequent examples do not need async functions. This is because the "type": "module" in package.json is set to run as an ES Modules.
Page Analysis
Okay, let's get started.
Please open the comment area of Apple AirPods Pro first, and then we need to identify the elements in which we want to capture the content. You can open the Devtools by pressing Ctrl + Shift + I (Windows/Linux) or Cmd + Option + I (Mac).
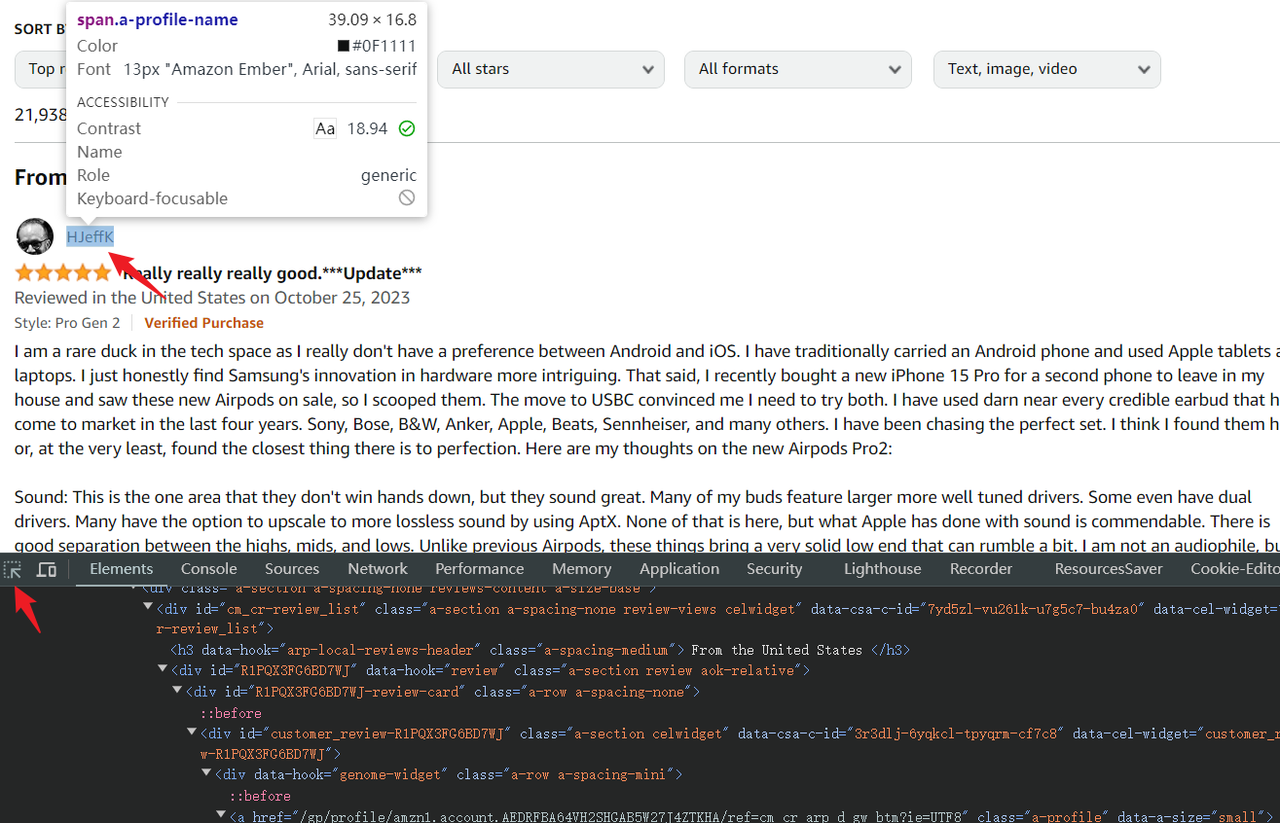
- Step 1. Click the element selector in the upper left corner of the console
- Step 2. Use the mouse to hover and select the element node you want to grab. The console will also highlight the HTML code corresponding to this element
Puppeteer supports multiple element selection methods (puppeteer selectors), but it is the most recommended method for getting started with simple CSS. The .devsite-search-field used above is also a CSS selector.
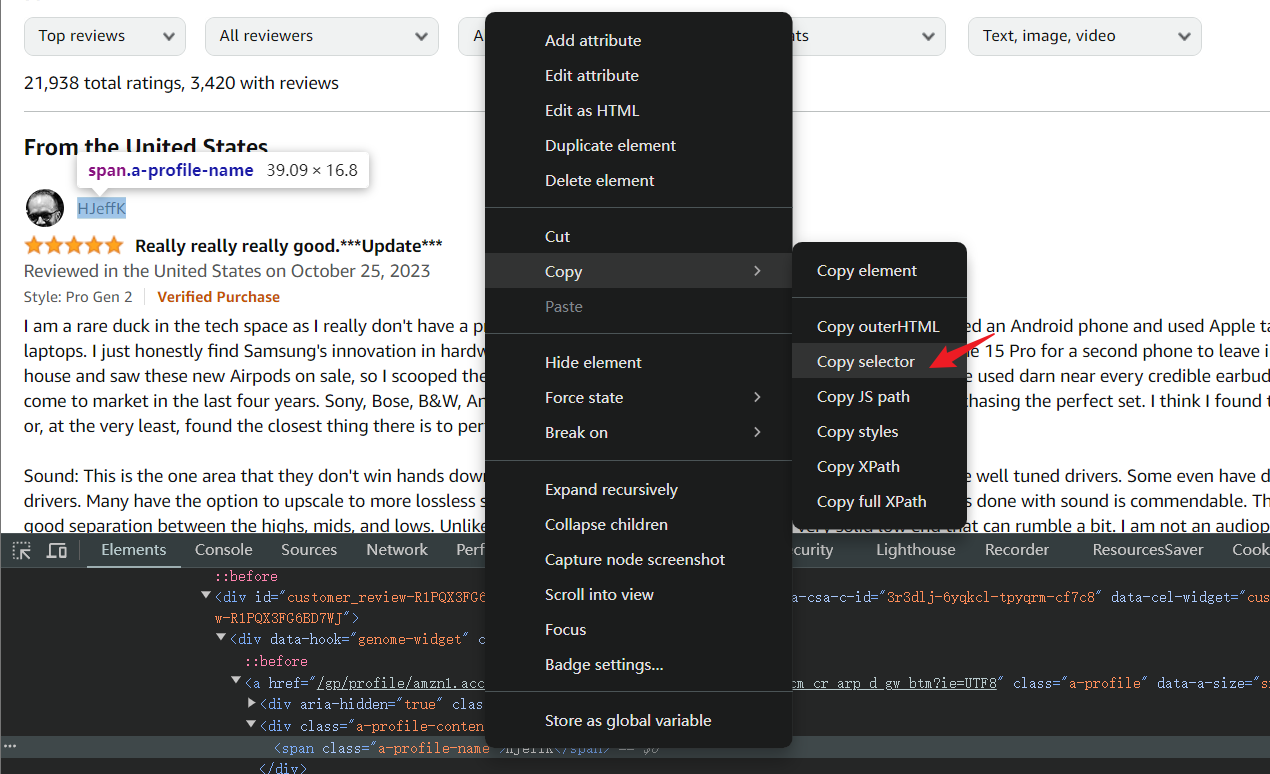
For complex CSS structures, the debug console can directly copy CSS selectors. Right-click on the element HTML that needs to be grabbed to open the menu > Copy > Copy selector.
But it is not recommended that you do this, because the selectors copied from complex structures are very poorly readable and not conducive to code maintenance. Of course, it is completely fine for some simple selections and personal testing and learning
Now, the element selector has been determined. We can use Puppeteer to try to grab the username I selected above.
JavaScript
import puppeteer from 'puppeteer';

const browser = await puppeteer.launch();
const page = await browser.newPage();
await page.goto(
  `https://www.amazon.com/Apple-Generation-Cancelling-Transparency-Personalized/product-reviews/B0CHWRXH8B/ref=cm_cr_dp_d_show_all_btm?ie=UTF8&reviewerType=all_reviews`
);

const username = await page.$eval('div[data-hook="genome-widget"] .a-profile-name', node => node.textContent)

console.log('[username]===>', username);
As you can see, the above code uses page.goto to jump to the specified page. Then page.$eval can get the first matched element node and get the specific attributes of the element node through a callback function.
If you are lucky enough not to trigger Amazon's verification page, you can successfully get the value. However, a stable script cannot rely on luck alone, so we still need to do some optimization next.
Waiting for the page to load
Although we have obtained the information of the element node through the above method, we must consider other factors: such as network loading speed, whether the page scrolls to the target element to load the element correctly, and whether the verification page is triggered and needs to be handled manually.
So before the loading is completed, we must wait patiently. Of course, puppeteer also provides us with corresponding APIs for us to use.
The commonly used waitForSelector is an API that waits for the element to appear. We can use it to optimize the above code to ensure the stability of the script. Just use the waitForSelector API before calling page.$eval.
In this way, the puppeteer will wait for the page to load the element div[data-hook="genome-widget"] .a-profile-name before executing the subsequent code.
JavaScript
await page.waitForSelector('div[data-hook="genome-widget"] .a-profile-name');
const username = await page.$eval('div[data-hook="genome-widget"] .a-profile-name', node => node.textContent)
There are also some other waiting APIs for different scenarios. Let's see some common ones:
page.waitForFunction(pageFunction, options, ...args): Waits for the specified function to return true in the page context.
JavaScript
import puppeteer from 'puppeteer'

const browser = await puppeteer.launch();
const page = await browser.newPage();
await page.goto('https://example.com');

// Wait for the page's `window.title` to change to "Example Domain"
await page.waitForFunction('document.title === "Example Domain"');
console.log('Title has changed to "Example Domain"');

await browser.close();page.waitForNavigation(options): Wait for page navigation to complete. Navigation can be clicking a link, submitting a form, callingwindow.location, etc.
JavaScript
import puppeteer from 'puppeteer';

const browser = await puppeteer.launch();
const page = await browser.newPage();
await page.goto('https://example.com');

// Click the link and wait for the navigation to complete
await Promise.all([
  page.click('a'),
  page.waitForNavigation()
])

console.log('Navigation complete');
await browser.close();
page.waitForRequest(urlOrPredicate, options): Waits for requests matching the specified URL or conditional function.
JavaScript
import puppeteer from "puppeteer";

const browser = await puppeteer.launch({ headless: false });
const page = await browser.newPage();
await page.goto('https://example.com');

// The request requires you to monitor the request URL of the actual page. This is just an example.
// But you can manually enter https://example.com/resolve in the browser address bar to trigger the request and verify this demo
const Request = await page.waitForRequest('https://example.com/resolve');

console.log('request-url:', Request.url());
await browser.close()
page.waitForResponse(urlOrPredicate, options): Waits for a response matching the specified URL or conditional function.
JavaScript
import puppeteer from "puppeteer";

const browser = await puppeteer.launch({ headless: false });
const page = await browser.newPage();
await page.goto('https://example.com');

// The response requires you to monitor the response URL of the actual page. This is just an example.
// But you can manually enter https://example.com/resolve in the browser address bar to trigger the response and verify this demo
const response = await page.waitForResponse('https://example.com/resolve');

console.log('response-status:', response.status());
await browser.close();page.waitForNetworkIdle(options): Waits for network activity on the page to become idle. This method is useful for ensuring that a page has finished loading.
JavaScript
import puppeteer from "puppeteer";

const browser = await puppeteer.launch();
const page = await browser.newPage();
await page.goto('https://example.com');

await page.waitForNetworkIdle({
  timeout: 30000, // Maximum waiting time 30 seconds
  idleTime: 500   // That is, there is no network activity within 500 milliseconds of idle time
});

console.log('Network is idle.');

// Save a screenshot to verify whether the page has been fully loaded
await page.screenshot({ path: 'example.png' });
await browser.close();setTimeout: Using the Javascript API directly is also a good choice. After a little packaging, it can be run in the context of the page.
JavaScript
// Wait two seconds before executing the subsequent script
await new Promise(resolve => setTimeout(resolve, 2000))
await page.click('.devsite-result-item-link'); // Click on this element
Do you have any wonderful ideas or doubts about web scraping and browserless?
Let’s see what other developers are sharing on Discord and Telegram!
Crawling and storing data
Okay, let's start scraping the complete data in the page comment list.
- Step 1. Data scraping
We can rewrite the above code to no longer crawl only a single username but focus on the entire comment list.
The following code also uses page.waitForSelector to wait for the comment element to be loaded, and uses page.$$ to get all element nodes matched by the element selector:
JavaScript
await page.waitForSelector('div[data-hook="review"]');
const reviewList = await page.$$('div[data-hook="review"]');
Next, we need to loop through the comment element list and get the information we need from each comment element.
In the following code, we can get the textContent of title, rate, username, and content, and get the attribute value of data-src in the avatar element node, which is the URL address of the avatar.
JavaScript
for (const review of reviewList) {
  const title = await review.$eval(
    'a[data-hook="review-title"] .cr-original-review-content',
    node => node.textContent,
  );
  const rate = await review.$eval(
    'i[data-hook="review-star-rating"] .a-icon-alt',
    node => node.textContent,
  );
  const username = await review.$eval(
    'div[data-hook="genome-widget"] .a-profile-name',
    node => node.textContent,
  );
  const avatar = await review.$eval(
    'div[data-hook="genome-widget"] .a-profile-avatar img',
    node => node.getAttribute('data-src'),
  );
  const content = await review.$eval(
    'span[data-hook="review-body"] span',
    node => node.textContent,
  );
 console.log('[log]===>', { title, rate, username, avatar, content });
}- Step 2. Store data
By running the above code, you should be able to see the log information printed in the terminal.
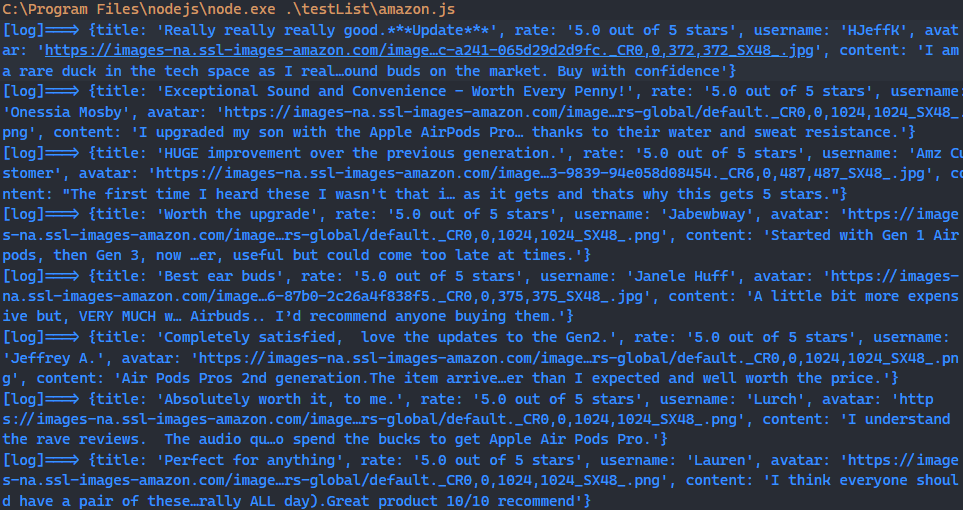
If you want to further store this data, you can use the basic nodejs module fs to write the data into a json for your subsequent data analysis.
The following is a simple tool function:
JavaScript
import fs from 'fs';

function saveObjectToJson(obj, filename) {
  const jsonString = JSON.stringify(obj, null, 2)
  fs.writeFile(filename, jsonString, 'utf8', (err) => {
    err ? console.error(err) : console.log(`File saved successfully: ${filename}`);
  });
}
The complete code is as follows. After running, you can find amazon_reviews_log.json in the path of the current script execution. This file records all your crawling results!
JavaScript
import puppeteer from 'puppeteer';
import fs from 'fs';

const browser = await puppeteer.launch();
const page = await browser.newPage();
await page.goto(
  `https://www.amazon.com/Apple-Generation-Cancelling-Transparency-Personalized/product-reviews/B0CHWRXH8B/ref=cm_cr_dp_d_show_all_btm?ie=UTF8&reviewerType=all_reviews`
);

await page.waitForSelector('div[data-hook="review"]');
const reviewList = await page.$$('div[data-hook="review"]');

const reviewLog = []

for (const review of reviewList) {
  const title = await review.$eval(
    'a[data-hook="review-title"] .cr-original-review-content',
    node => node.textContent,
  );
  const rate = await review.$eval(
    'i[data-hook="review-star-rating"] .a-icon-alt',
    node => node.textContent,
  );
  const username = await review.$eval(
    'div[data-hook="genome-widget"] .a-profile-name',
    node => node.textContent,
  );
  const avatar = await review.$eval(
    'div[data-hook="genome-widget"] .a-profile-avatar img',
    node => node.getAttribute('data-src'),
  );
  const content = await review.$eval(
    'span[data-hook="review-body"] span',
    node => node.textContent,
  );
  console.log('[log]===>', { title, rate, username, avatar, content });
  reviewLog.push({ title, rate, username, avatar, content })
}

function saveObjectToJson(obj, filename) {
  const jsonString = JSON.stringify(obj, null, 2)
  fs.writeFile(filename, jsonString, 'utf8', (err) => {
    err ? console.error(err) : console.log(`File saved successfully: ${filename}`);
  });
}

saveObjectToJson(reviewLog, 'amazon_reviews_log.json')
await browser.close()
Other Functional Examples of Puppeteer
Understanding the basic usage above? Now, we can continue to look at the powerful functions of Puppeteer. After running the following examples, I believe you will have a new understanding of this tool.
1. Simulate mouse movement
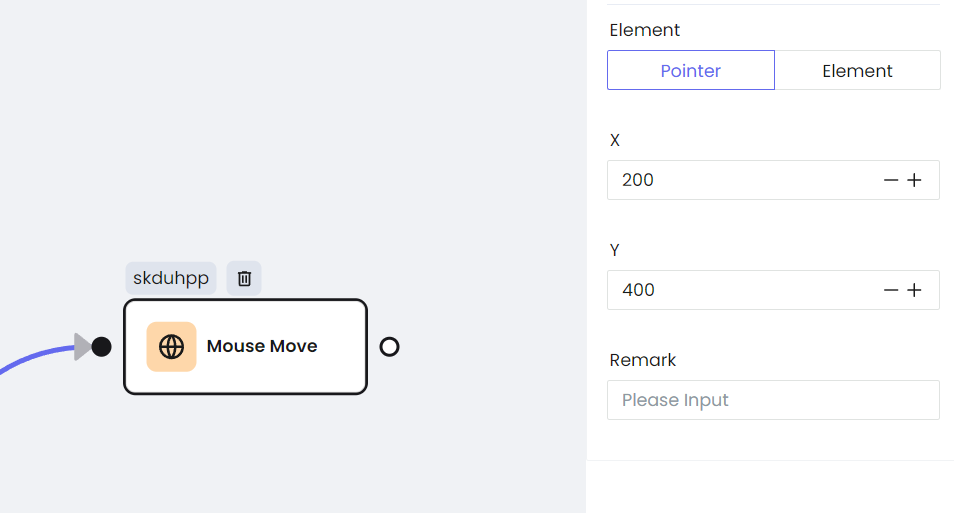
Use page.mouse.move to operate your mouse movement.
In order to let you feel that the cursor is indeed moving on the page, the following demo is an infinite loop, which will cause the mouse to move randomly to trigger the hover style of the page.
It should be noted that the premise of triggering hover is that the mouse cannot move too fast. Configure the steps: 10 movement rate in the move method. And this step can also reduce the probability of the website being detected.
Page.evaluate is a very useful API that allows you to execute JavaScript code that only runs in the browser environment in the context of the page, such as using the window API. The purpose here is to scroll the page to the bottom so that the page comments will be fully loaded.
JavaScript
import puppeteer from 'puppeteer';

const browser = await puppeteer.launch({ headless: false });
const page = await browser.newPage();
await page.goto('https://www.google.com');

// Get the width and height of the screen
const { width, height } = await page.evaluate(() => {
  return { width: window.innerWidth, height: window.innerHeight };
});

// Infinite loop, simulate random mouse movement
while (true) {
  const x = Math.floor(Math.random() * width);
  const y = Math.floor(Math.random() * height);
  await page.mouse.move(x, y, { steps: 10 });
  console.log(`The mouse position: (${x}, ${y})`);
  await new Promise(resolve => setTimeout(resolve, 200)); // Moves every 0.2 seconds
}
2. Click the button and fill in the form
We have also encountered this in the initial demo. How about changing the way of writing and using some other APIs to implement it?
You can see that some selectors below are preceded by >>>, which is the Shadow DOM selector provided by the puppeeter. Most operations are set with a delay trigger through delay, which can well simulate the behavior of real people. It makes your script more stable and avoids triggering the anti-crawler mechanism of some websites.
JavaScript
import puppeteer from 'puppeteer';

const browser = await puppeteer.launch({
  headless: false,
  // defaultView sets width and height to 0, which means the web page content fills the entire window.
  defaultViewport: { width: 0, height: 0 }
});
const page = await browser.newPage();

await page.goto('https://developer.chrome.com/docs/css-ui?hl=de');

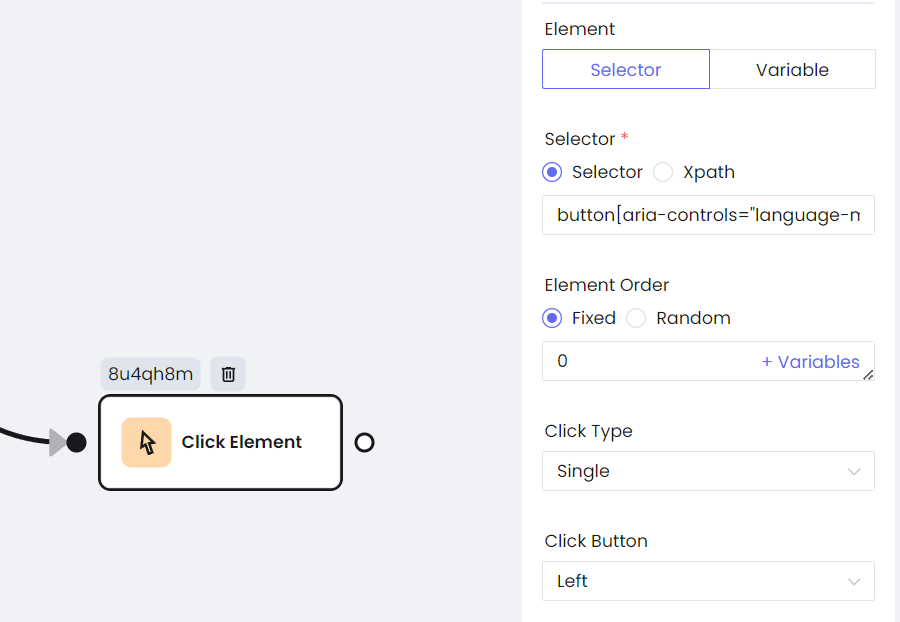
await page.click('>>> button[aria-controls="language-menu"]', { delay: 500 });

// Jump to a new page and wait for the jump to succeed
await Promise.all([
  page.click('>>> li[role="presentation"]', { delay: 500 }),
  page.waitForNavigation(),
])

// Use setTimeout as a delayer to wait 2 seconds to load the page
await new Promise(resolve => setTimeout(resolve, 2000))

// Focus on the input search box
await page.focus('input.devsite-search-query', { delay: 500 });

// Input text through the keyboard
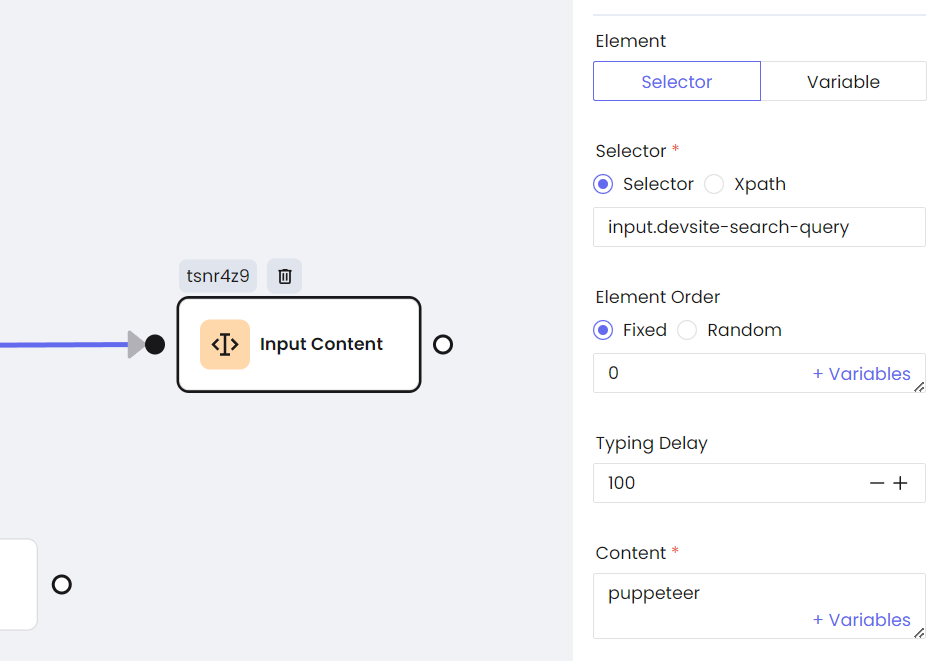
await page.keyboard.type('puppeteer', { delay: 200 });

// Trigger the keyboard enter key and submit the form
await page.keyboard.press('Enter')

console.log('form submit successfully');
await page.close()
3. Use Puppeteer to take screenshots
Puppeteer provides an out-of-the-box screenshot API, which is a very practical feature that we have seen in the examples above.
The quality of the screenshot file can be well controlled through quality, and clip is used to crop the image. If you have requirements for the screenshot ratio, you can also set defaultViewport to achieve it.
JavaScript
import puppeteer from 'puppeteer';

const browser = await puppeteer.launch({ defaultViewport: { width: 1920, height: 1080 } });
const page = await browser.newPage();

await page.goto('https://www.youtube.com/');

await page.screenshot({ path: 'screenshot1.png', });
await page.screenshot({ path: 'screenshot2.jpeg', quality: 50 });
await page.screenshot({ path: 'screenshot3.jpeg', clip: { x: 0, y: 0, width: 150, height: 150 } });

console.log('screenshot saved');
await browser.close();
4. Block or intercept requests in Puppeteer
To intercept requests, you first need to use setRequestInterception to activate request interception. Run the following demo and you will be surprised to find that the page style is gone, and the pictures and icons also disappear.
This is because the request is monitored through the page, and the resourceType and url of interceptedRequest are used to determine whether to cancel or rewrite the corresponding request.
We have to note that the isInterceptResolutionHandled method should be called before processing request interception to avoid repeated processing of requests or conflicts.
JavaScript
import puppeteer from 'puppeteer';

const browser = await puppeteer.launch({ headless: false });
const page = await browser.newPage();

// Activate request interception
await page.setRequestInterception(true);
page.on('request', interceptedRequest => {
  // Avoid request being processed repeatedly
  if (interceptedRequest.isInterceptResolutionHandled()) return;
  // Intercept request and rewrite response
  if (interceptedRequest.url().includes('https://fonts.gstatic.com/')) {
    interceptedRequest.respond({
      status: 404,
      contentType: 'image/x-icon',
    })
    console.log('icons request blocked');
    // Block style request
  } else if (interceptedRequest.resourceType() === 'stylesheet') {
    interceptedRequest.abort();
    console.log('Stylesheet request blocked');
    // Block image request
  } else if (interceptedRequest.resourceType() === 'image') {
    interceptedRequest.abort();
    console.log('Image request blocked');
  } else {
    interceptedRequest.continue();
  }
});

await page.goto('https://www.youtube.com/');
Of course, the above functions can also be achieved with the help of some tools, such as using the Nstbrowser RPA to make your crawler faster!
Step 1. Go to the homepage of Nstbrowser, and click RPA/Workflow > create workflow.
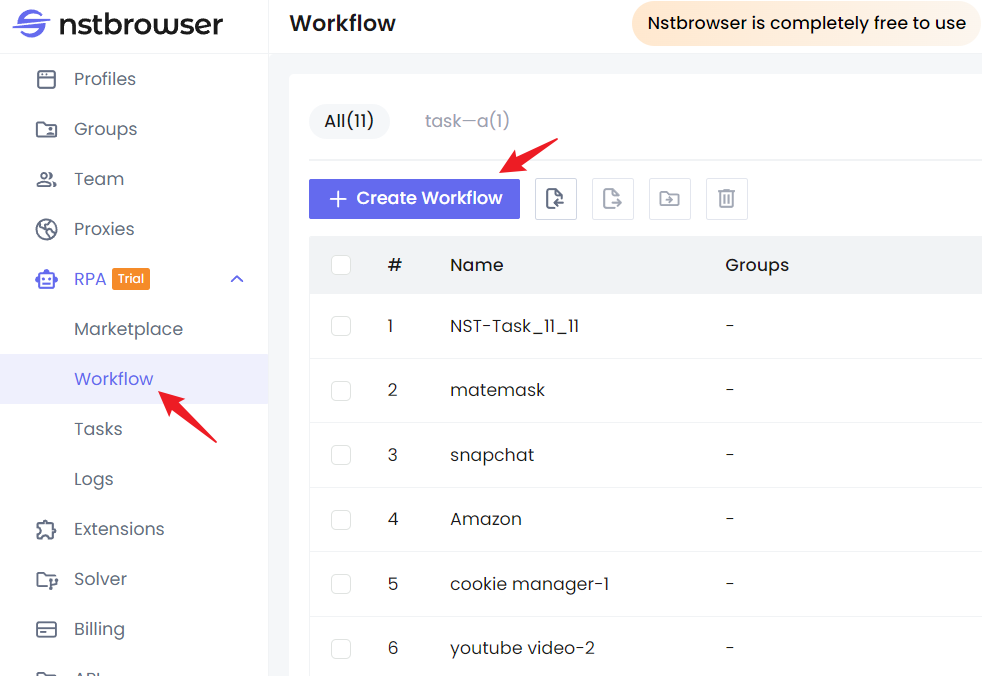
Step 2. After entering the workflow editing page, you can directly reproduce the above functions by dragging the mouse.
The Node on the left can meet almost all your crawler or automation needs, and these nodes are highly consistent with the puppeteer API.
You can calibrate the execution order of these nodes by connecting them like executing Javascript async code. If you know Puppeteer, you can quickly get started with the Nstbrowser RPA function. It is just what you see is what you get.
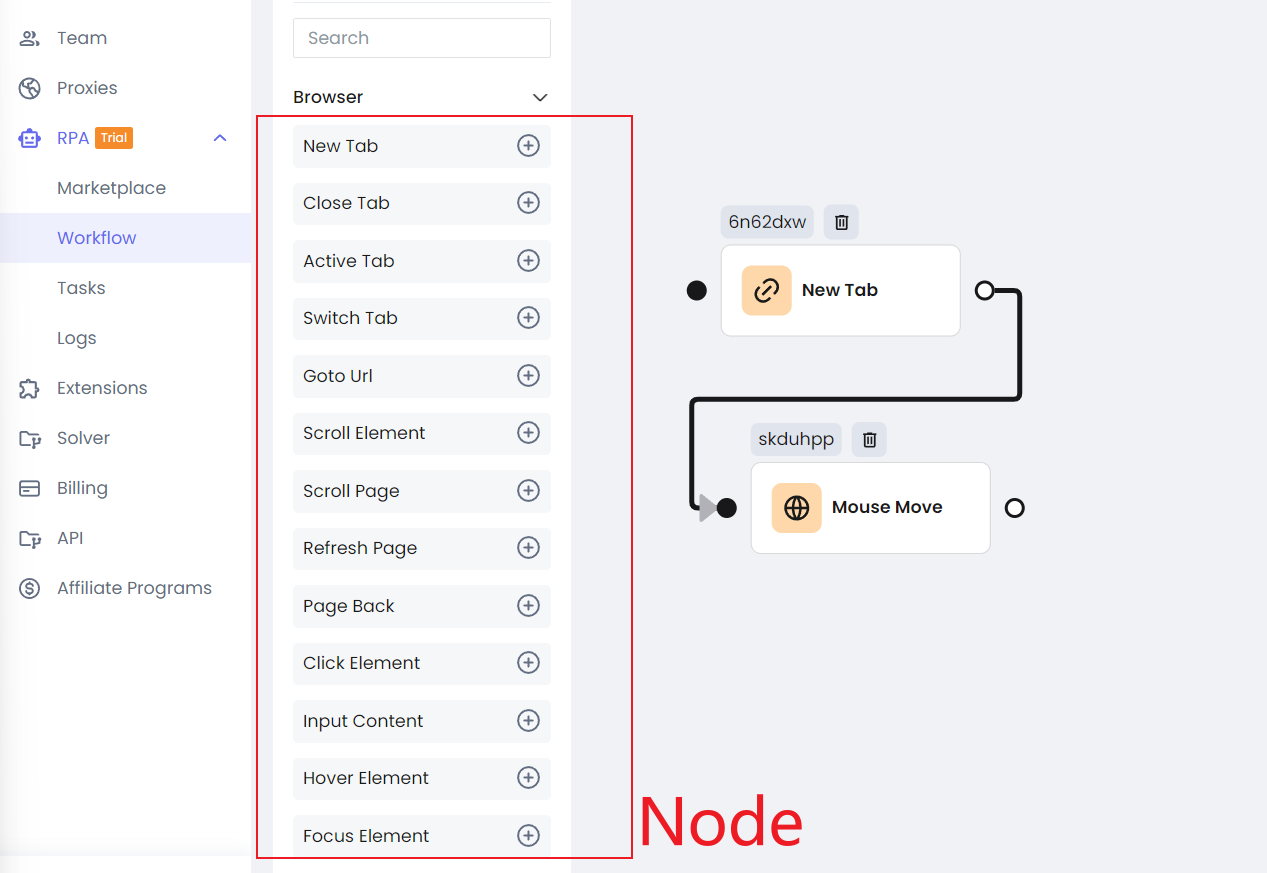
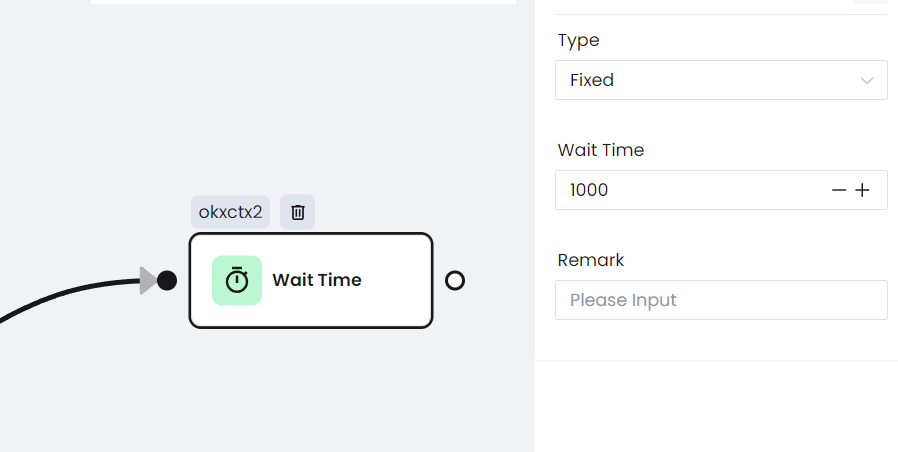
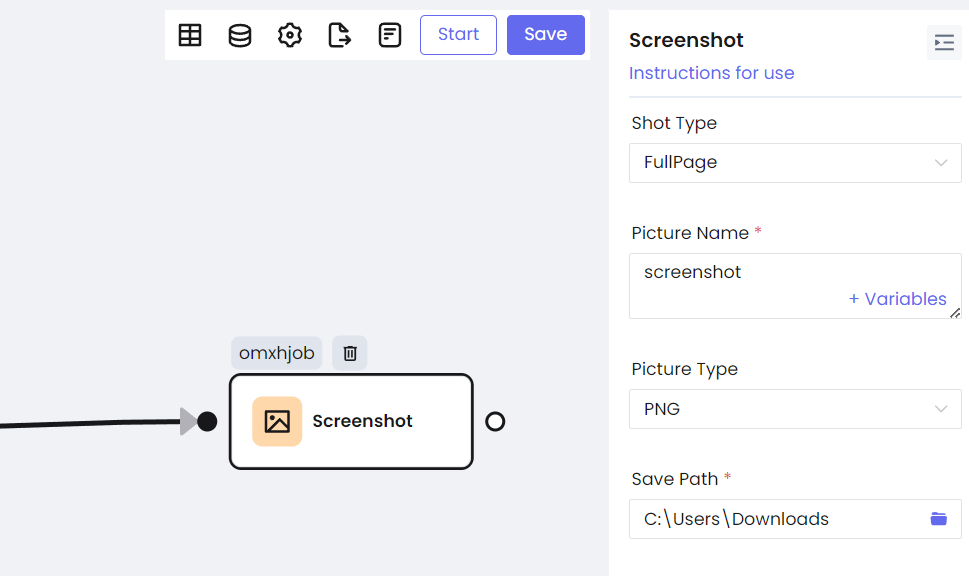
Step 3. Each Node can be configured individually, and the configuration information almost corresponds to the configuration of Puppeteer.
a. Mouse movement
b. Click the button
c. Input
d. Keyboard keys
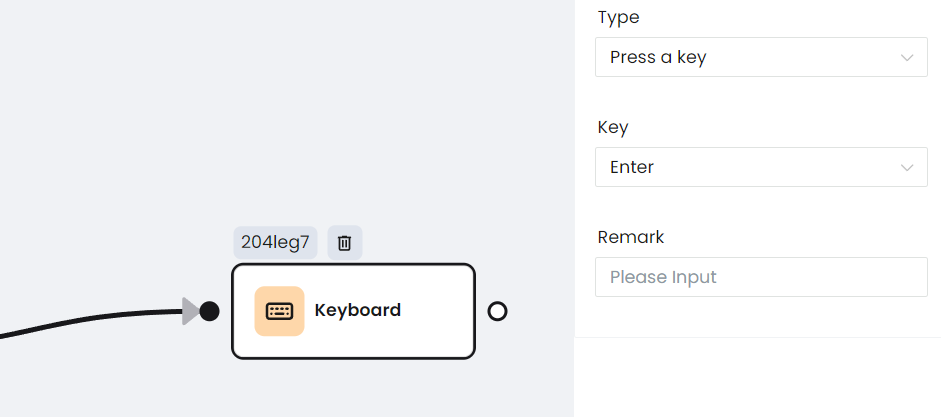
e. Wait for a response
f. Screenshot
In addition, Nstbrowser RPA has more common and unique nodes. You can perform common crawling operations with a simple drag and drop.
Setting HTTP Headers to Avoid Robot Detection
HTTP headers are additional information exchanged between the client (browser) and the server. They contain metadata for requests and responses, such as content type, user agent, language settings, etc.
Common HTTP headers include:
User-Agent: Identifies the client application type, operating system, software version, and other information.Accept-Language: Indicates the language that the client can understand and its priority.Referer: Indicates the source page of the request.
By modifying these headers, you can disguise yourself as a different browser or operating system, thereby reducing the risk of being detected as a robot.
When using Puppeteer, you can use the page.setExtraHTTPHeaders method to set the headers before jumping to the web page:
JavaScript
import puppeteer from 'puppeteer';

const browser = await puppeteer.launch({ headless: false });
const page = await browser.newPage();

// Setting custom HTTP headers
await page.setExtraHTTPHeaders({
  'Accept-Language': 'en-US,en;q=0.9',
  'Referer': 'https://www.google.com',
  'MyHeader': 'hello puppeteer'
});

await page.goto('https://www.httpbin.org/headers');
But if you want to modify the User-Agent, you can't use the above method. Because the User-Agent in the browser has a default value. If you really want to change it, you can use page.setUserAgent.
JavaScript
import puppeteer from "puppeteer";

const browser = await puppeteer.launch();
const page = await browser.newPage();

await page.setUserAgent('Mozilla/5.0 (Macintosh; Intel Mac OS X 10_15_7) AppleWebKit/537.36 (KHTML, like Gecko) Chrome/115.0.5790.98 Safari/537.36');

await page.goto('https://example.com/');
const navigator = await page.evaluate(_ => window.navigator.userAgent)
const platform = await page.evaluate(_ => window.navigator.platform)
console.log('userAgent: ', navigator);
console.log('platform: ', platform);
await browser.close();
But this step is not enough. From the information printed above, the platform is still set to win32 and has not been actually modified.
Most websites detect through window.navigator. So it is necessary to deeply modify the navigator. Before using page.goto, we can deeply modify the navigator in page.evaluateOnNewDocument.
Here is a brief description of the difference between page.evaluateOnNewDocument and page.evaluate:
- If you need to modify the browser environment or perform some operations before each page loads, use
evaluateOnNewDocument. - If you only need to interact with the currently loaded page or extract data. Use evaluate.
JavaScript
await page.evaluateOnNewDocument(() => {
  Object.defineProperties(navigator, {
    platform: {
      get: () => 'Mac'
    },
  });
});
The Bottom Lines
Every line in this article is playing a crucial role to describe the most detailed guides about:
- What is headlesschrome?
- What is Puppeteer?
- How to use headlesschrome to do web scraping?
Want to do web scraping and automation effortlessly? Nstbrowser RPA helps you simplify all tasks.
More


