
Browserless
How to Scrape Amazon Product Data Using Puppeteer and Browserless?
Amazon web scraping will largely avoid time-consuming and labor-intensive problems. Read this tutorial and find the effective way to scrape Amazon.
Nov 08, 2024Robin Brown
You can always find all relevant and valuable information about products, sellers, reviews, ratings, specials, news, etc. on Amazon. Whether it is a seller doing market research or an individual collecting data, using a high-quality, convenient and fast tool will help you to accurately crawl various information on Amazon to a great extent.
Why Is Scraping Amazon Product Data Important?
Amazon gathers valuable information in one place: products, reviews, ratings, exclusive offers, news, etc. Therefore, data scraping on Amazon will largely avoid time-consuming and labor-intensive problems. As a business, using Amazon product scraper can bring you at least the following 4 significant benefits:
- Understand the prices in the local or even global market and compare prices
- Analyze the differences with competitors
- Identify target groups
- Improve product image
- Predict user needs
- Collect customer information
Typical Reasons to Scrape Amazon Products
- Monitor Competitor Pricing and Products
- Understand Market Trends
- Optimize Marketing Strategies
- Improve Product Listings
- Price Optimization
- Enhance Product Research
- Track Customer Sentiment
Does Browserless Help to Build an Amazon Product Scraper?
Headless browsers are excellent in performing automated work? That's right, we will use Nstbrowser's most powerful headless browser service: Browserless to crawl Amazon product information.
When crawling Amazon product data, we always encounter a series of severe challenges such as robot detection, verification code recognition, and IP blocking. Using Browserless can fully avoid these headaches!
Nstbrowser's Browserless provides real user browser fingerprints, and each fingerprint is unique. In addition, participating in our subscription plan can achieve full captcha bypass, escorting your unimpeded access experience. Join our Discord referral program to share $1,500 in cash now!
How Can We Scrap Amazon Product Data?
Without further ado, let's now officially start using Browserless for data crawling!
Prerequisites
Before we start, we need to connect to the Browserless service. Using Browserless can solve complex web scraping and large-scale automation tasks, and you can really enjoy the fully managed cloud deployment.
Browserless adopts a browser-centric concept, provides powerful headless deployment capabilities, and provides higher performance and reliability. For more information about Browserless, you can refer to our relevant documentation.
Get the API KEY and go to the Browserless menu page of the Nstbrowser client, or you can click here to access it directly.

Install Puppeteer and connect to Browserless
- Install Puppeteer. The lighter puppeteer-core is a better choice.
Bash
# pnpm
pnpm i puppeteer-core
# yarn
yarn add puppeteer-core
# npm
npm i --save puppeteer-core- We have prepared the code to call Browserless. You only need to fill in the apiKey and proxy to start the subsequent Amazon product scraper operation:
JavaScript
const apiKey = "your ApiKey"; // required
const config = {
    proxy: 'your proxy', // required; input format: schema://user:password@host:port eg: http://user:password@localhost:8080
    // platform: 'windows', // support: windows, mac, linux
    // kernel: 'chromium', // only support: chromium
    // kernelMilestone: '128', // support: 128
    // args: {
    //     "--proxy-bypass-list": "detect.nstbrowser.io"
    // }, // browser args
    // fingerprint: {
    //     userAgent: 'Mozilla/5.0 (Windows NT 10.0; Win64; x64) AppleWebKit/537.36 (KHTML, like Gecko) Chrome/128.0.6613.85 Safari/537.36', // userAgent supportted since v0.15.0
    // },
};
const query = new URLSearchParams({
    token: apiKey, // required
    config: JSON.stringify(config),
});
const browserlessWSEndpoint = `https://less.nstbrowser.io/connect?${query.toString()}`;
Start crawling
Step1: Check the target page
Before crawling, we can try to go to https://www.amazon.com/. If it is the first time visiting, there is a high probability that a verification code will appear:
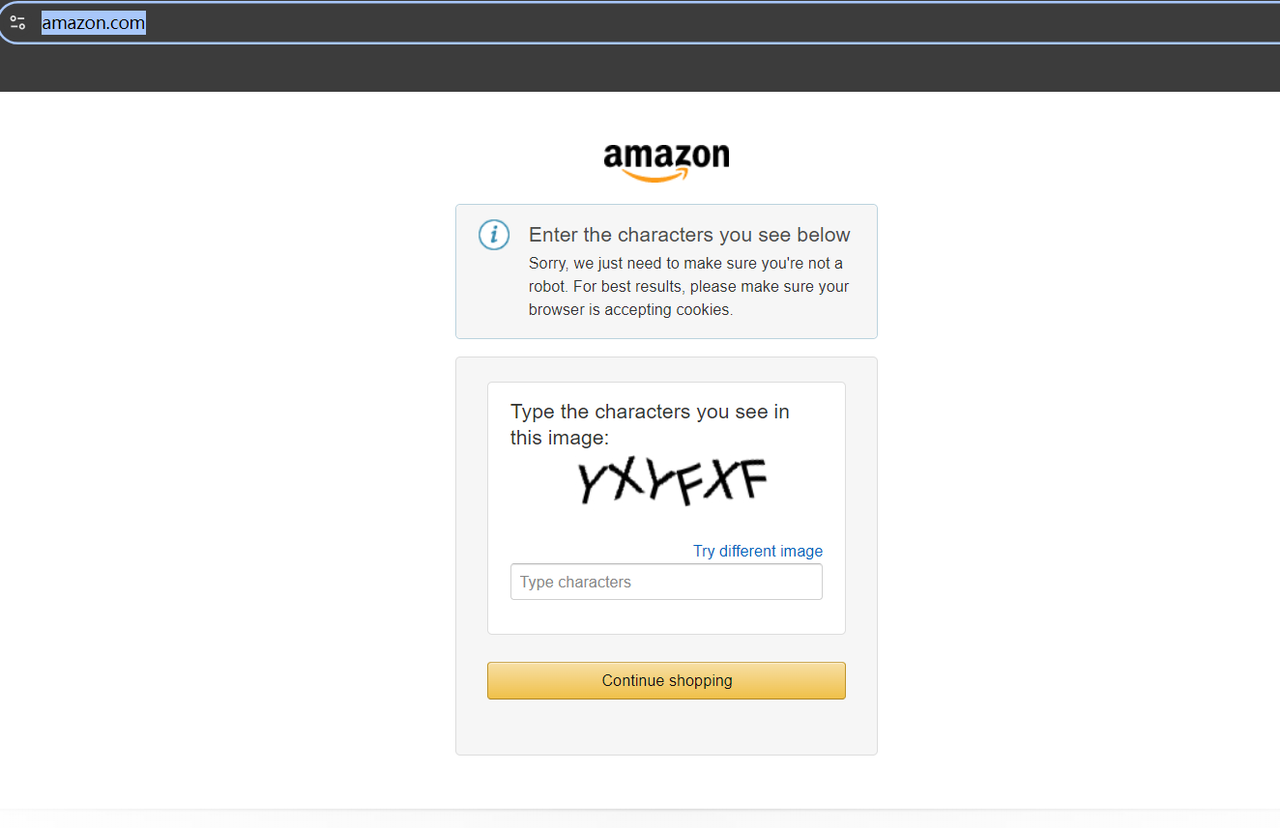
But it doesn't matter, we don't have to go to great lengths to find a verification code decoding tool. At this time, you only need to visit the Amazon domain name in your region or the region of your proxy, and the verification code will not be triggered.
For example, let's visit: https://www.amazon.co.uk/: the Amazon domain name in the UK. We can see the page smoothly, then try to enter the product keyword we want in the top search bar or directly visit through the URL, like:
Bash
https://www.amazon.co.uk/s?k=shirtThe value after /s?k= in the URL is the keyword of the product. By accessing the above URL, you will see shirt-related products on Amazon. Now you can open the "Developer Tools" (F12) to check the HTML structure of the page and confirm the data we need to crawl later by positioning the cursor.

Step2: Scriptwriting
First, I added a string of code at the top of the script. The following code uses the first script parameter as the Amazon product keyword, and subsequent scripts will also use this parameter to crawl:
JavaScript
const productName = process.argv.slice(2);

if (productName.length !== 1) {
  console.error('product name CLI arguments missing!');
  process.exit(2);
}
Next, we need to:
- Import Puppeteer and connect to Browserless
- Go to the product query result page corresponding to Amazon
- Add a screenshot to verify whether the access is successful
JavaScript
import puppeteer from "puppeteer-core";

const browser = await puppeteer.connect({
  browserWSEndpoint: browserlessWSEndpoint,
  defaultViewport: null,
})
console.info('Connected!');

const page = await browser.newPage();

await page.goto(`https://www.amazon.co.uk/s?k=${productName}`);

// Add screenshots to facilitate subsequent troubleshooting
await page.screenshot({ path: 'amazon_page.png' })
Now we use page.$$ to get a list of all products, loop through the product list, and get the relevant data one by one in the loop. Then collect this data into the productDataList array and print it:
JavaScript
// Get the container element of all search results
const productContainers = await page.$$('div[data-component-type="s-search-result"]')
const productDataList = []
// Get various information about the product: title, rating, image link, price
for (const product of productContainers) {
async function safeEval(selector, evalFn) {
try {
return await product.$eval(selector, evalFn);
} catch (e) {
return null;
}
}
const title = await safeEval('.s-title-instructions-style > h2 > a > span', node => node.textContent)
const rate = await safeEval('a > i.a-icon.a-icon-star-small > span', node => node.textContent)
const img = await safeEval('span[data-component-type="s-product-image"] img', node => node.getAttribute('src'))
const price = await safeEval('div[data-cy="price-recipe"] .a-offscreen', node => node.textContent)
productDataList.push({ title, rate, img, price })
}
console.log('amazon_product_data_list :', productDataList);
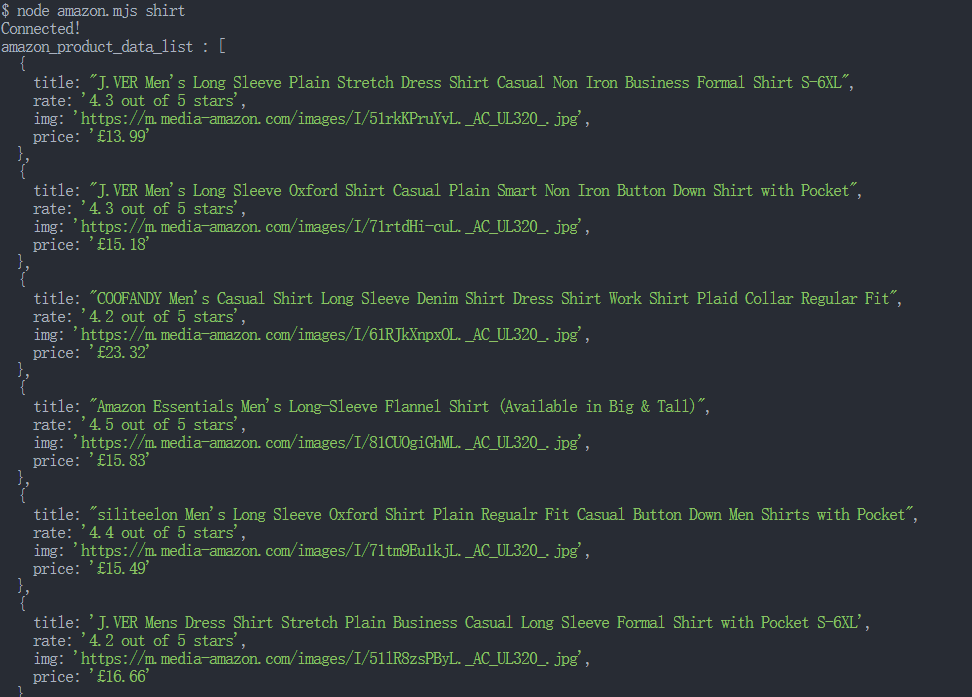
await browser.close();Running the script:
Bash
node amazon.mjs shirtIf successful, the following will be printed on the console:
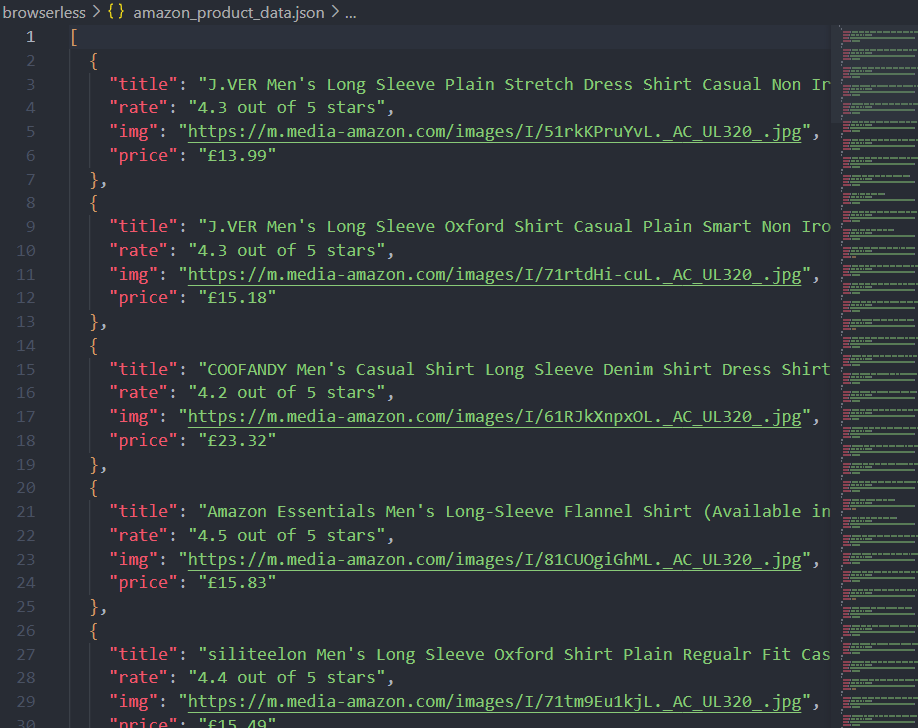
Step3: Output the crawled data as a JSON file
Obviously, in order to better analyze the data, it is not enough to just print the data in the console. Here is a simple example: quickly convert a JS object to a JSON file through the fs module:
JavaScript
import fs from 'fs'

function saveObjectToJson(obj, filename) {
  const jsonString = JSON.stringify(obj, null, 2)
  fs.writeFile(filename, jsonString, 'utf8', (err) => {
    err ? console.error(err) : console.log(`File saved successfully: ${filename}`);
  });
}

saveObjectToJson(productDataList, 'amazon_product_data.json')
Ok, let's take a look at our complete code:
JavaScript
import puppeteer from "puppeteer-core";
import fs from 'fs'

const productName = process.argv.slice(2);

if (productName.length !== 1) {
  console.error('product name CLI arguments missing!');
  process.exit(2);
}

const apiKey = "your ApiKey"; // 'your proxy'

const config = {
  proxy: 'your proxy', // required; input format: schema://user:password@host:port eg: http://user:password@localhost:8080
  // platform: 'windows', // support: windows, mac, linux
  // kernel: 'chromium', // only support: chromium
  // kernelMilestone: '128', // support: 128
  // args: {
  //     "--proxy-bypass-list": "detect.nstbrowser.io"
  // }, // browser args
  // fingerprint: {
  //     userAgent: 'Mozilla/5.0 (Windows NT 10.0; Win64; x64) AppleWebKit/537.36 (KHTML, like Gecko) Chrome/128.0.6613.85 Safari/537.36', // userAgent supportted since v0.15.0
  // },
};

const query = new URLSearchParams({
  token: apiKey, // required
  config: JSON.stringify(config),
});

const browserlessWSEndpoint = `https://less.nstbrowser.io/connect?${query.toString()}`;

const browser = await puppeteer.connect({
  browserWSEndpoint: browserlessWSEndpoint,
  defaultViewport: null,
})
console.info('Connected!');

const page = await browser.newPage();

await page.goto(`https://www.amazon.co.uk/s?k=${productName}`);

// Add screenshots to facilitate subsequent troubleshooting
await page.screenshot({ path: 'amazon_page.png' })

// Get the container element of all search results
const productContainers = await page.$$('div[data-component-type="s-search-result"]')

const productDataList = []

// Get various information about the product: title, rating, image link, price
for (const product of productContainers) {

  async function safeEval(selector, evalFn) {
    try {
      return await product.$eval(selector, evalFn);
    } catch (e) {
      console.log(`Error fetching ${selector}:`, e);
      return null;
    }
  }

  const title = await safeEval('.s-title-instructions-style > h2 > a > span', node => node.textContent)
  const rate = await safeEval('a > i.a-icon.a-icon-star-small > span', node => node.textContent)
  const img = await safeEval('span[data-component-type="s-product-image"] img', node => node.getAttribute('src'))
  const price = await safeEval('div[data-cy="price-recipe"] .a-offscreen', node => node.textContent)

  productDataList.push({ title, rate, img, price })
}

function saveObjectToJson(obj, filename) {
  const jsonString = JSON.stringify(obj, null, 2)
  fs.writeFile(filename, jsonString, 'utf8', (err) => {
    err ? console.error(err) : console.log(`File saved successfully: ${filename}`);
  });
}

saveObjectToJson(productDataList, 'amazon_product_data.json')

console.log('amazon_product_data_list :', productDataList);

await browser.close();
Now, after running the script, you can not only see the console print, but also theamazon_product_data.json file written under the current path.
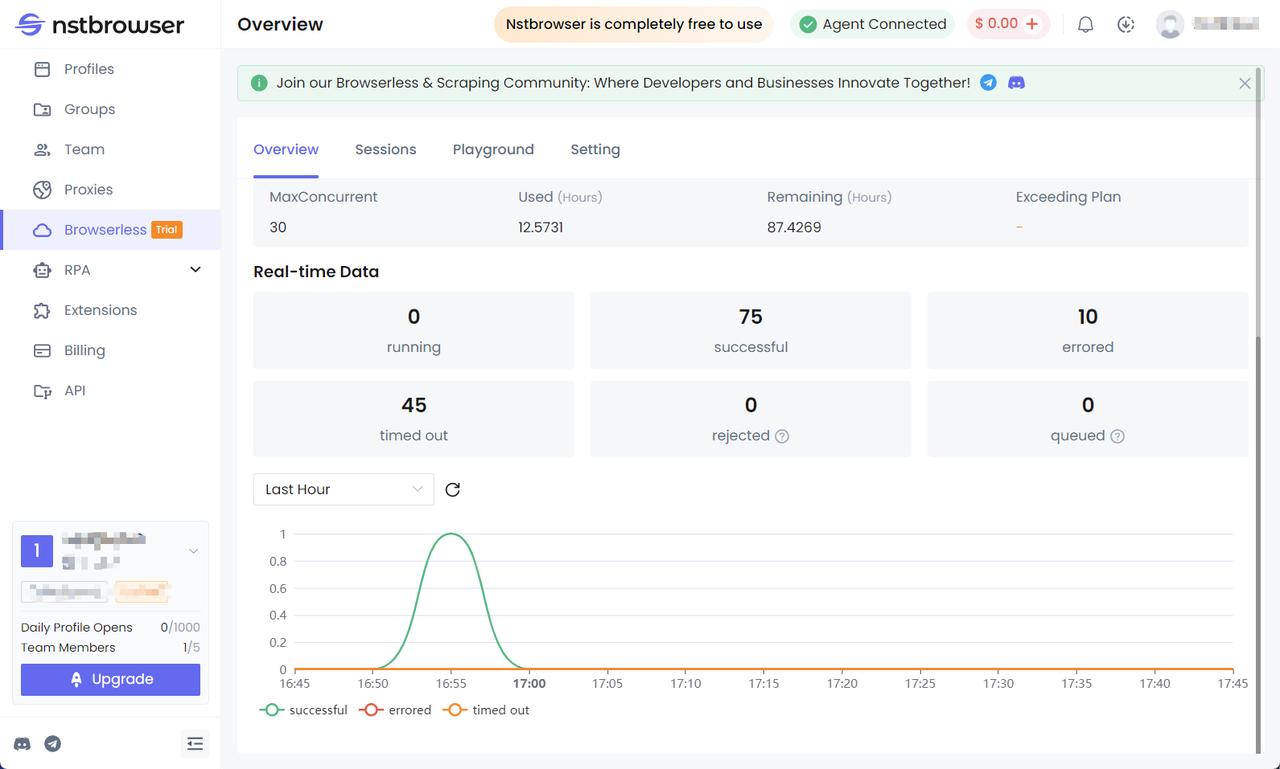
Check the Browserless dashboard
You can view statistics for recent requests and remaining session time in the Browserless menu of the Nstbrowser client.
Nstbrowser RPA: An Easier Way to Build Your Amazon Scraper
Using RPA tools to crawl web data is a common method of data collection. Using RPA tools can greatly improve the efficiency of data collection and reduce the cost of collection. Nstbrowser RPA function can provide you with the best RPA experience and the best work efficiency.
After reading this tutorial, you will:
- Understand how to use RPA for data collection
- Understand how to save the data collected by RPA
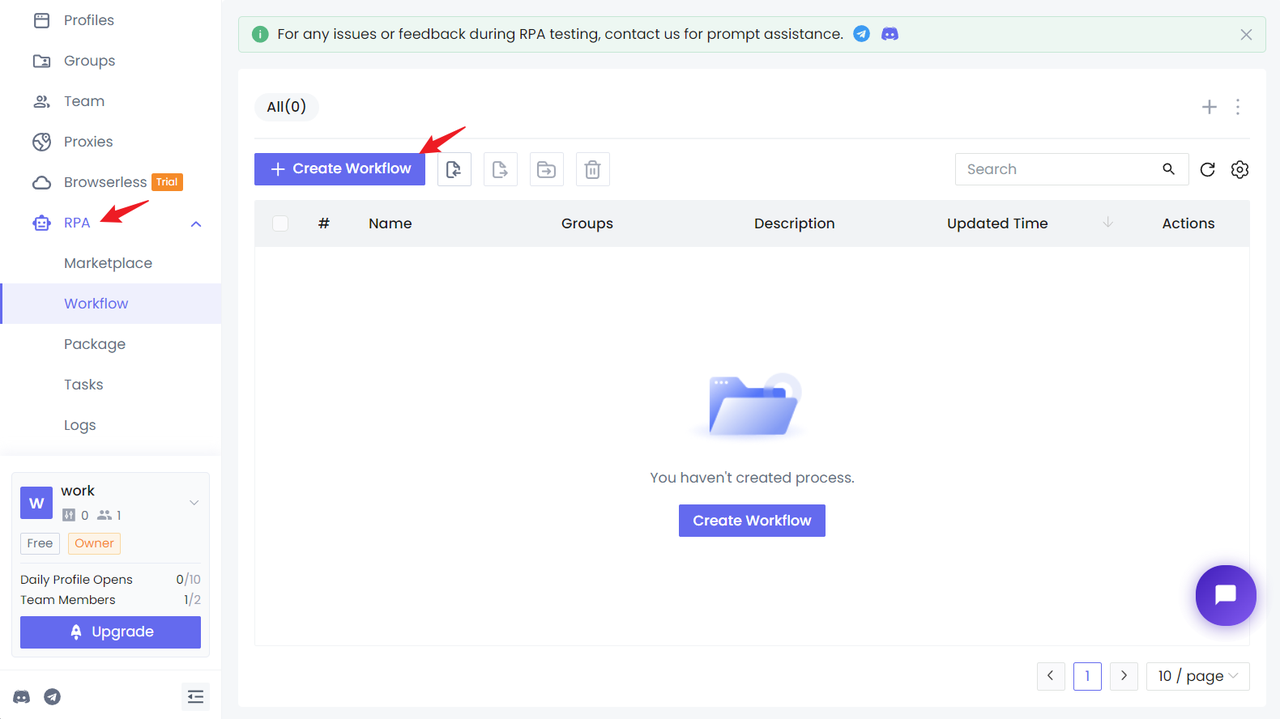
Preparation
First, you need to have an Nstbrowser account, and then log in to the Nstbrowser client, enter the workflow page of the RPA module, and click New Workflow.
Now, we can start configuring the RPA crawling workflow based on Amazon product search results.
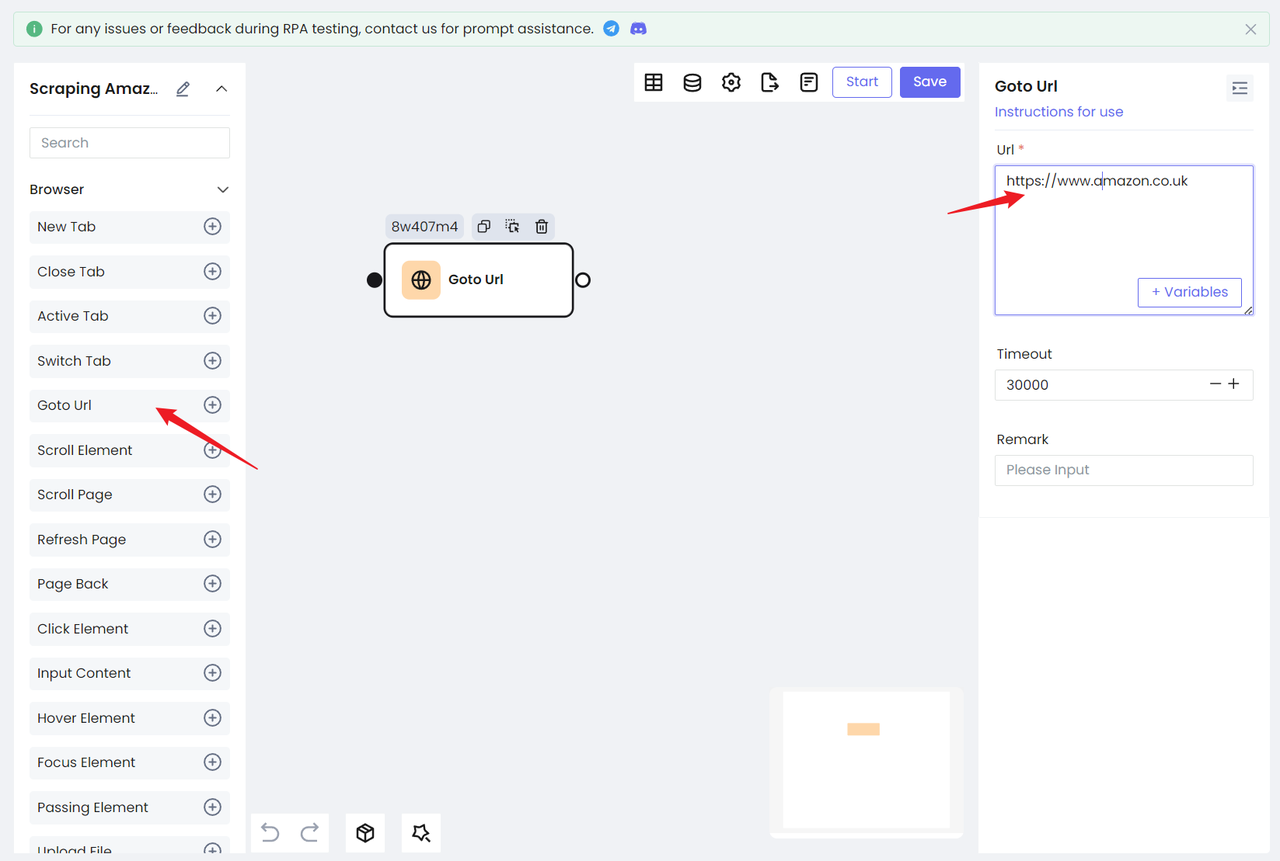
Step 1. Visit the target website
- We need to visit our target website: https://www.amazon.co.uk;
- You can also use the Amazon main site directly: https://www.amazon.com/, but you need to manually process the verification code for the first visit;
- Use the
Goto Urlnode, configure the website URL, and you can visit the target website:
Step 2. Search target content
This time we will not use the method of querying the corresponding product through the URL, but use RPA to help enter the input box on the homepage and then trigger the query jump. This will not only make us more familiar with the operation of RPA, but also avoid site risk control to a greater extent.
Okay, after reaching the target website, we need to search for the target address first. Here we need to use the Chrome Devtool tool to locate the HTML element.
- Open the Devtool tool and select the search box with the mouse. We can see:
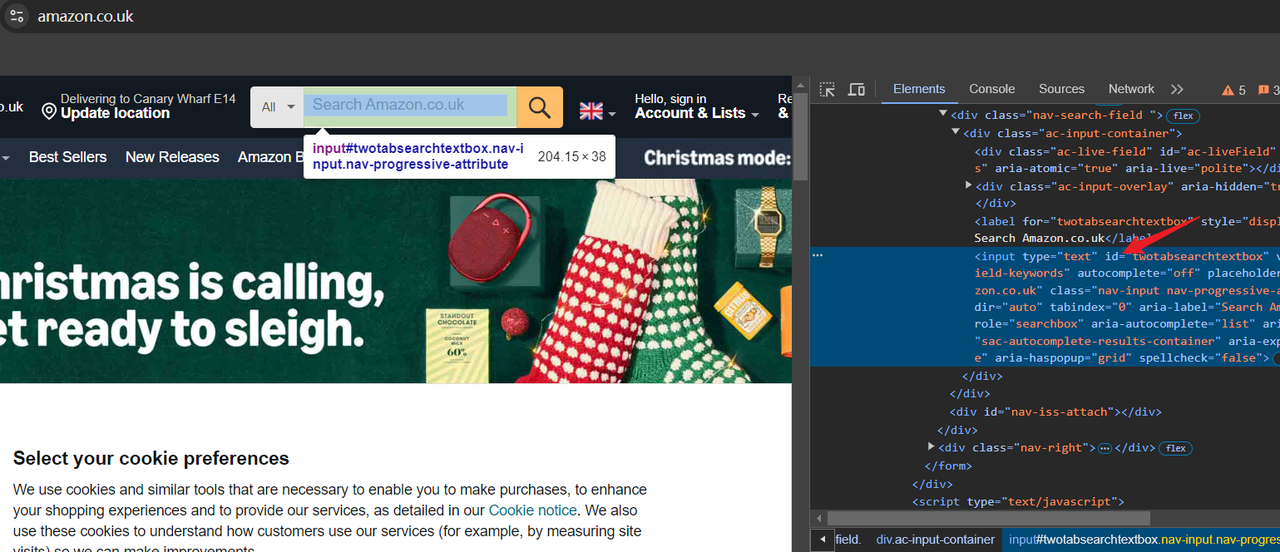
- Our target input box element has an id attribute, which can be used as a CSS selector to locate the input box.
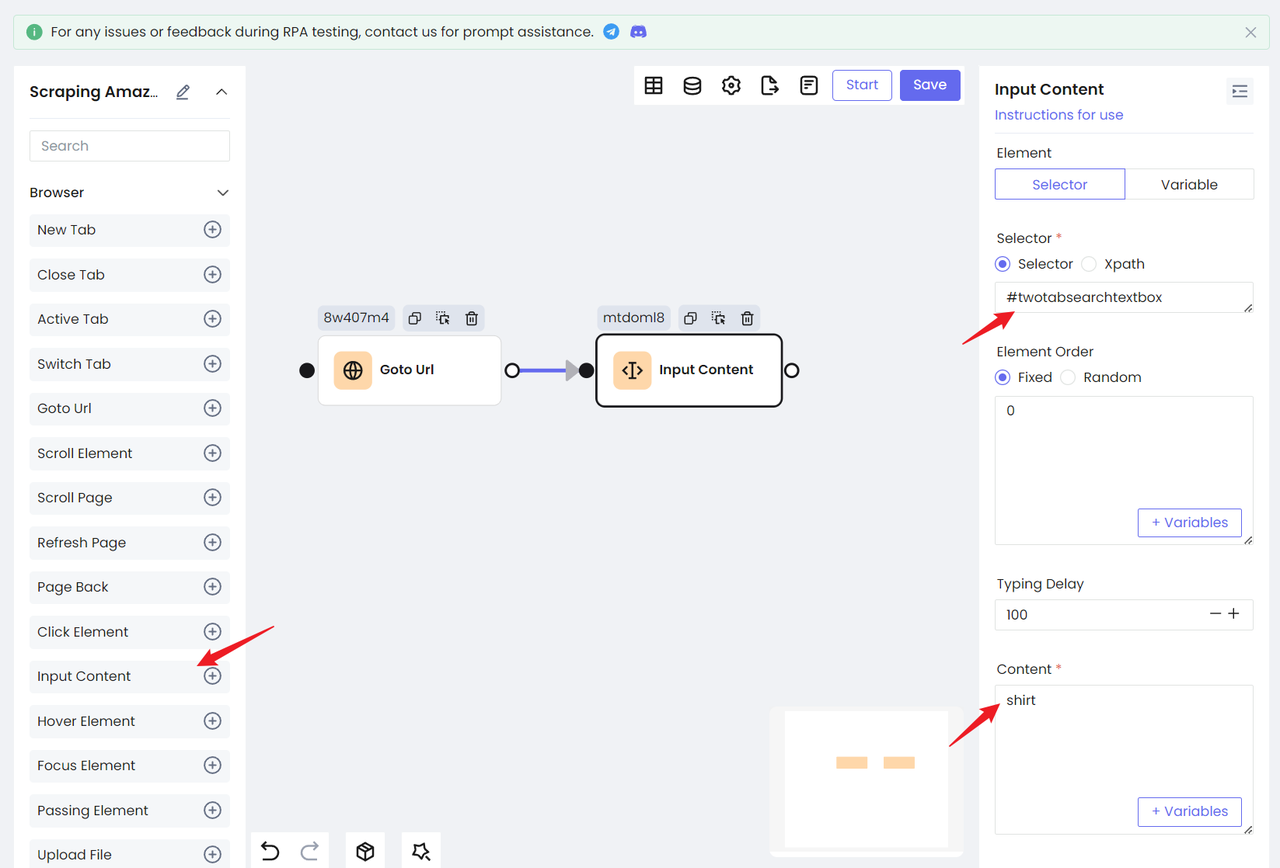
Add Input Content node:
- Select Selector in the Element option. This option uniformly selects Selector.
- Fill in the CSS selector of the
idwe are located in the input box - and then enter the content we want to search for in the Content option.
In this way, we have completed the action of entering the input box.
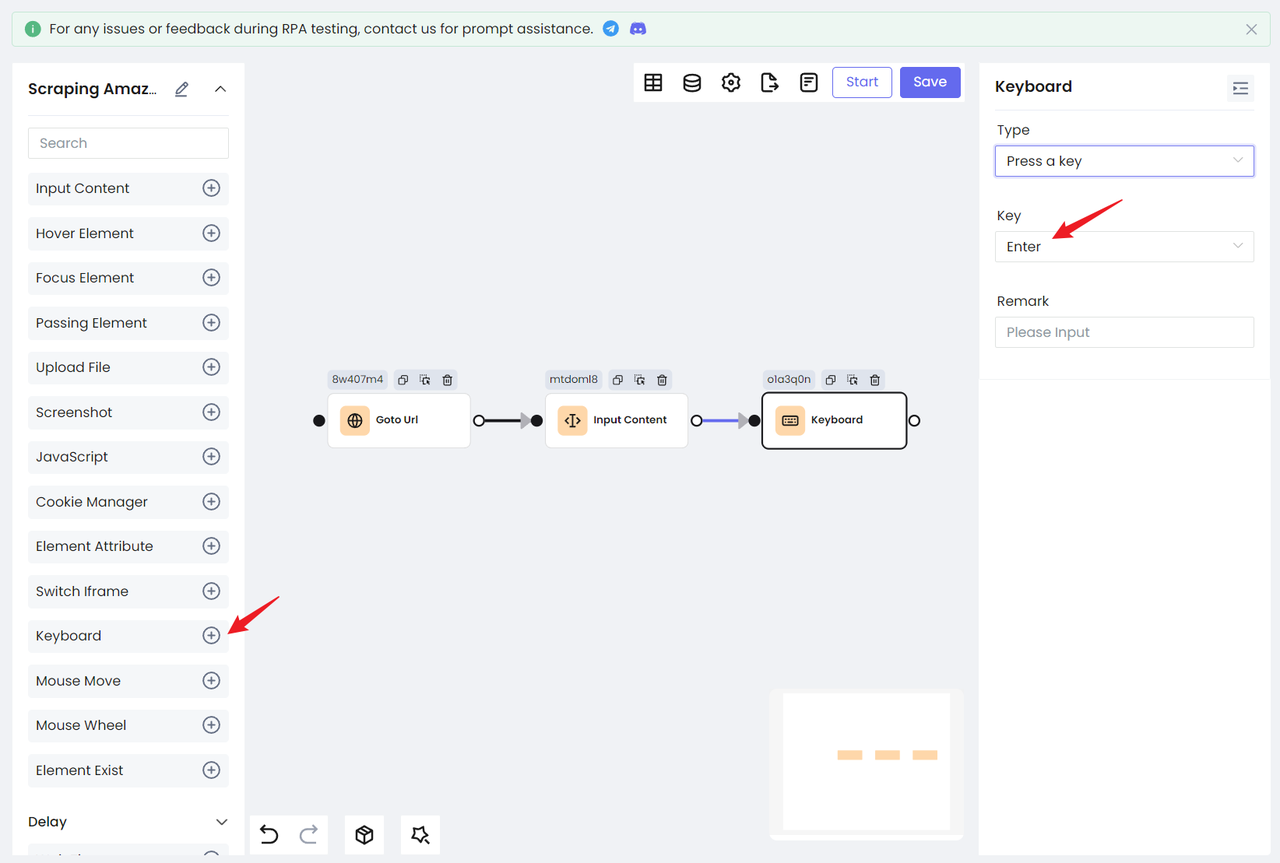
- Then use the
Keyboardnode to simulate the keyboard's enter action to search for products:
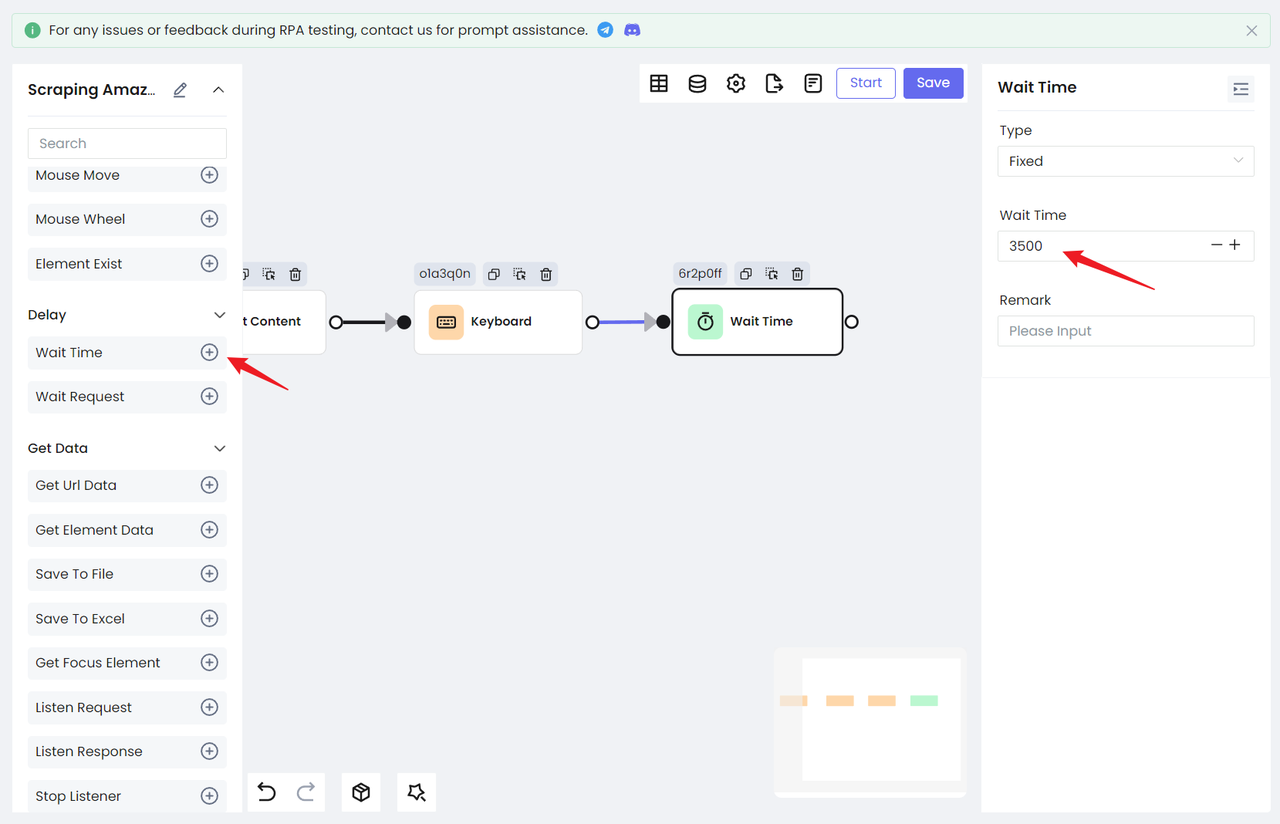
Because the search page will jump to a new page, we need to add a waiting action to ensure that we have successfully loaded the result page. Nstbrowser RPA provides two waiting behaviors: Wait Time and Wait Request.
Wait Time: used to wait for a period of time. You can choose a fixed time or a random time according to your specific situation.Wait Request: used to wait for the network request to end. Applicable to the situation of obtaining data through network requests.
Step 3. Traversing the product list
Okay, now we can successfully see the new product search page, and the next step is to crawl these contents.
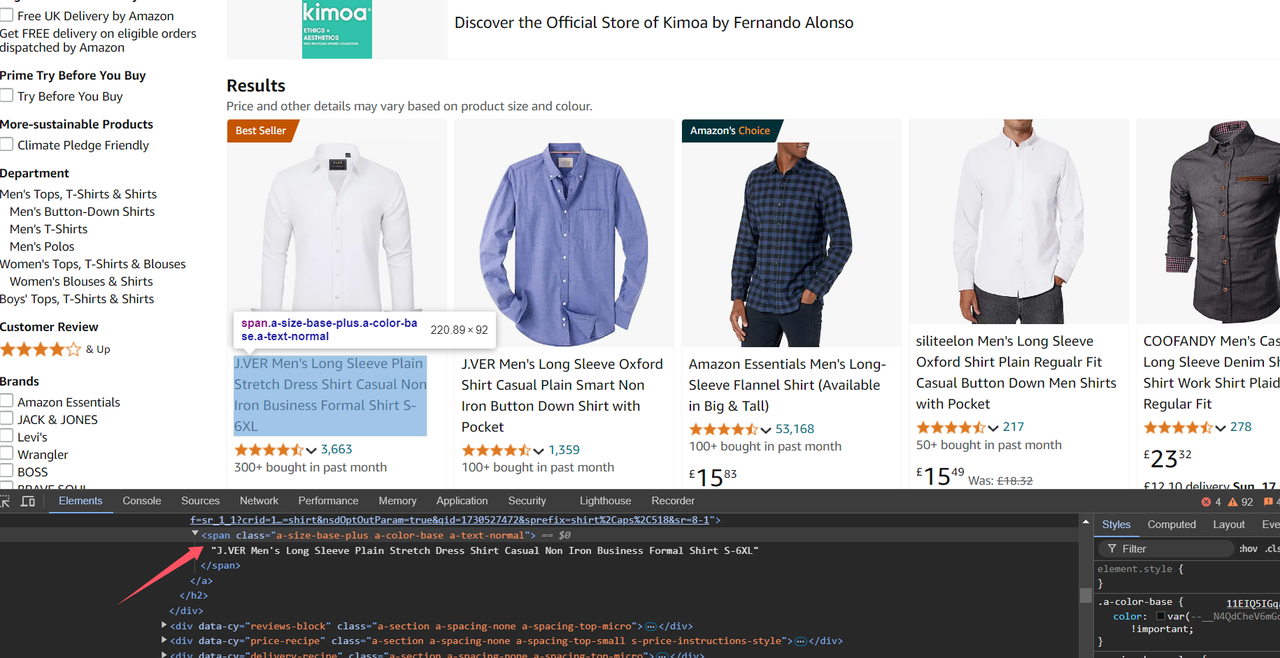
By observation, we can find that Amazon's search results are displayed in the form of a card list. This is a very classic display method:
Similarly, open the Devtool tool and locate each data in the card:
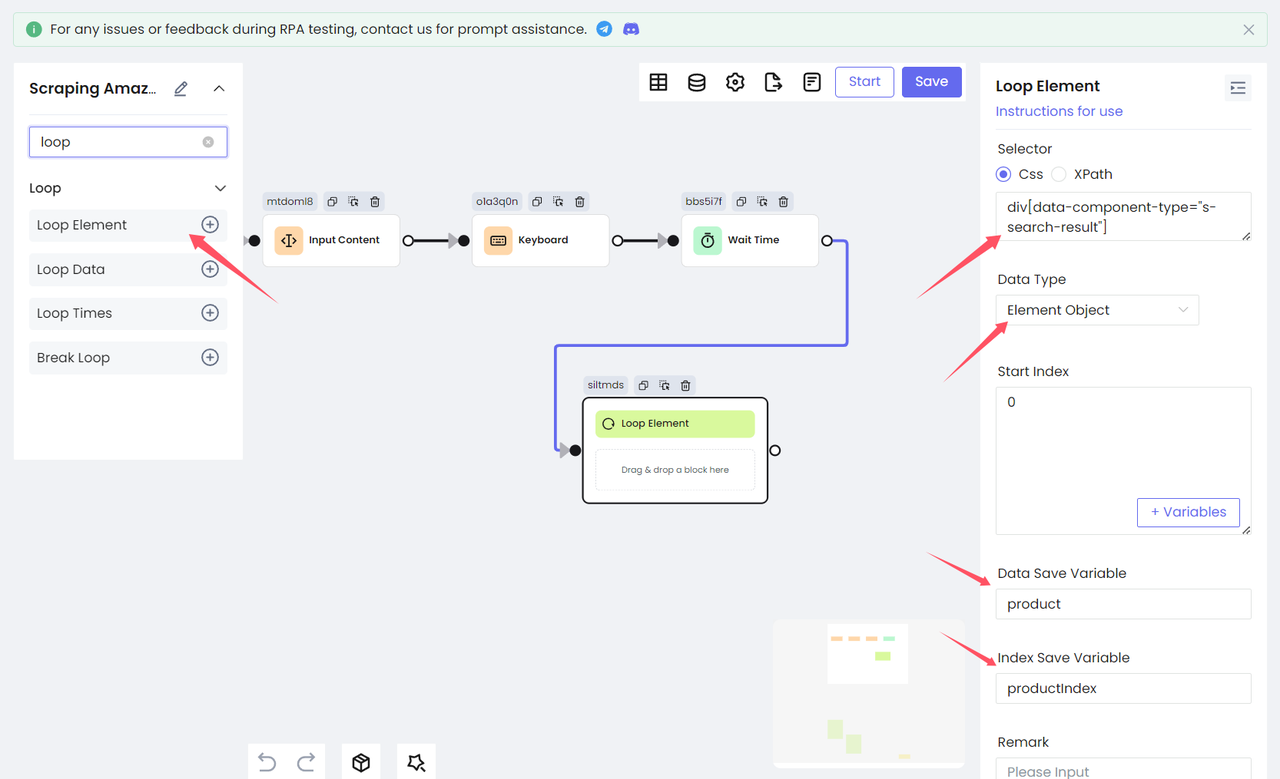
Because each item in the card list is an HTML element, we need to use the Loop Element node to traverse all the query results. We fill in the CSS selector of the product list in Selector and select Element Object for Data Type, which means getting the target element and saving it as an element object to a variable. Set the variable name to product through Data Save Variable, and save the index as productIndex.
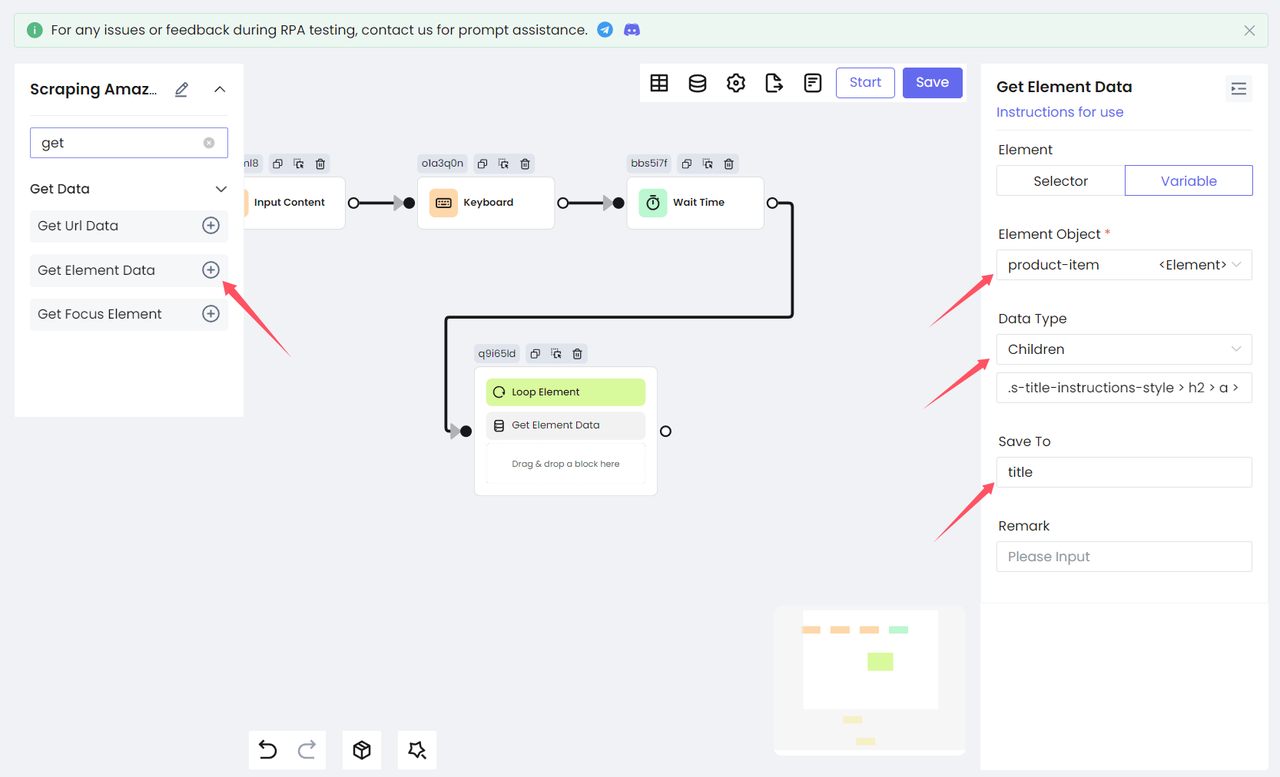
Step 4. Get data
Next, we need to process each traversed element and get the information we need from the product. We get the title element of the product. Here we need to use the Get Element Data node to get it and finally save it as the variable title.
Select Children as Data Type, which means getting the child elements of the target element and saving it as an element object in the variable title. You need to fill in the element selector of the child element. The CSS selector entered here is naturally the CSS selector of the product title:
Then we use the same method to convert the remaining product information: ratings, image links, and prices, all into RPA processes.
- Variable names and Children CSS selectors:
Bash
'title' .s-title-instructions-style > h2 > a > span
'rate' a > i.a-icon.a-icon-star-small > span
'img' span[data-component-type="s-product-image"] img
'price' div[data-cy="price-recipe"] .a-offscreen
However, the variable data obtained above are actually HTML elements. We still need to process them to output the text in the HTML elements and prepare for subsequent data storage.
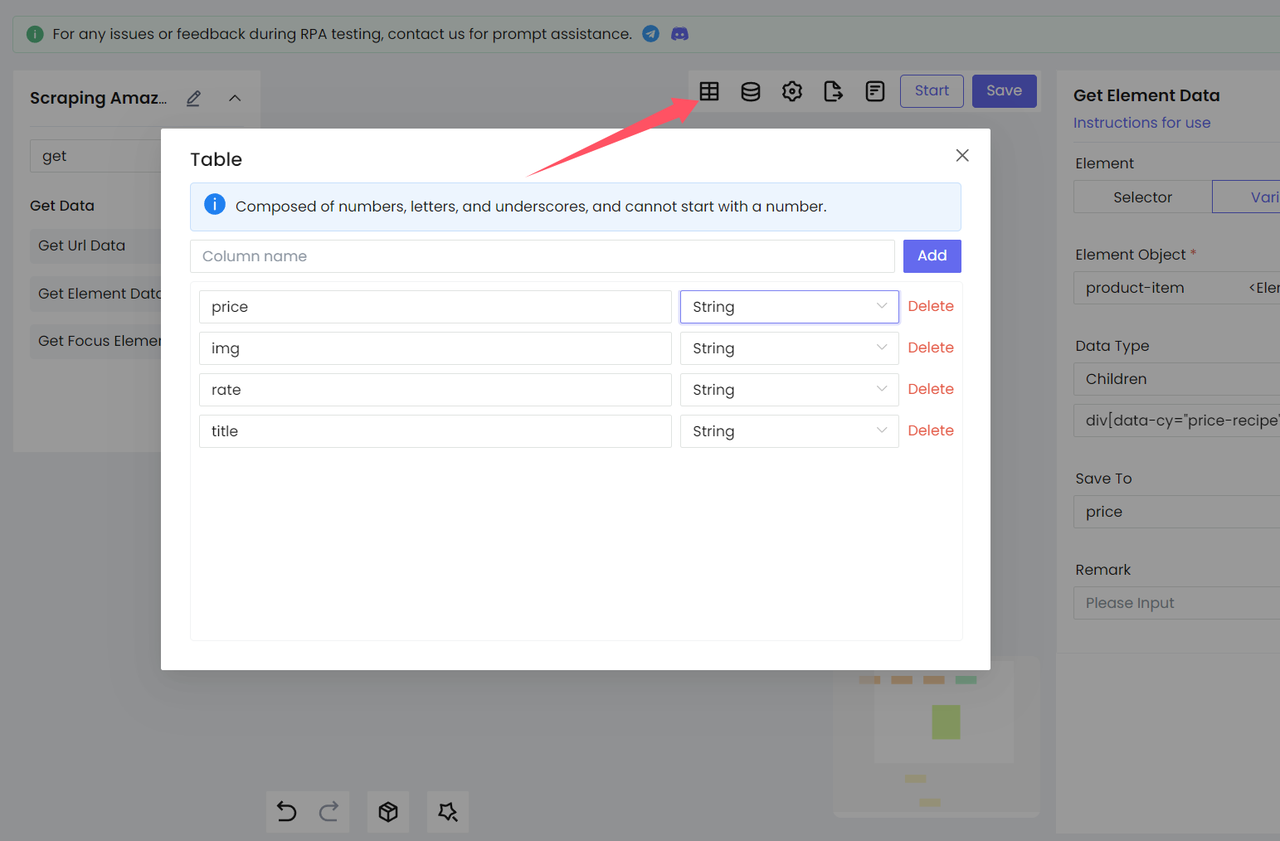
- Set up the table
We need to
- Set up the table
- And generate the corresponding Excel based on the fields of this table:
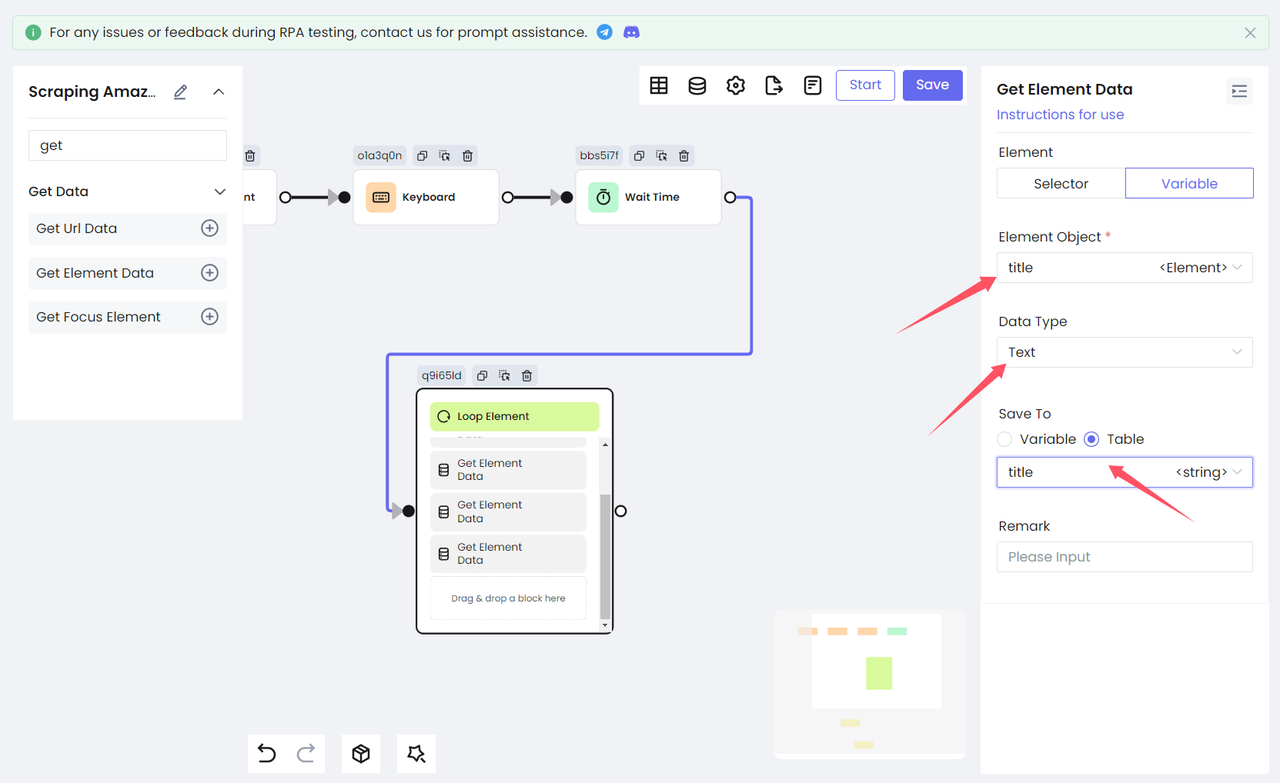
- Get the text of the element
Add the Get Element Data node again to output the variables obtained above as text and save them to the table variable for subsequent data storage. Select Data Type as Text to get the innerText of the target element. (The figure below shows the processing of the variable title)
- Get the link to the image
Then we use the same method to convert the product's rating and price into the final text information.
The image link needs additional processing. Here we use the javascript node to get the image src of the current traversed product. Note that the index variable productIndex saved by the Loop Element node needs to be injected into the script and finally saved as the variable imgSrc.
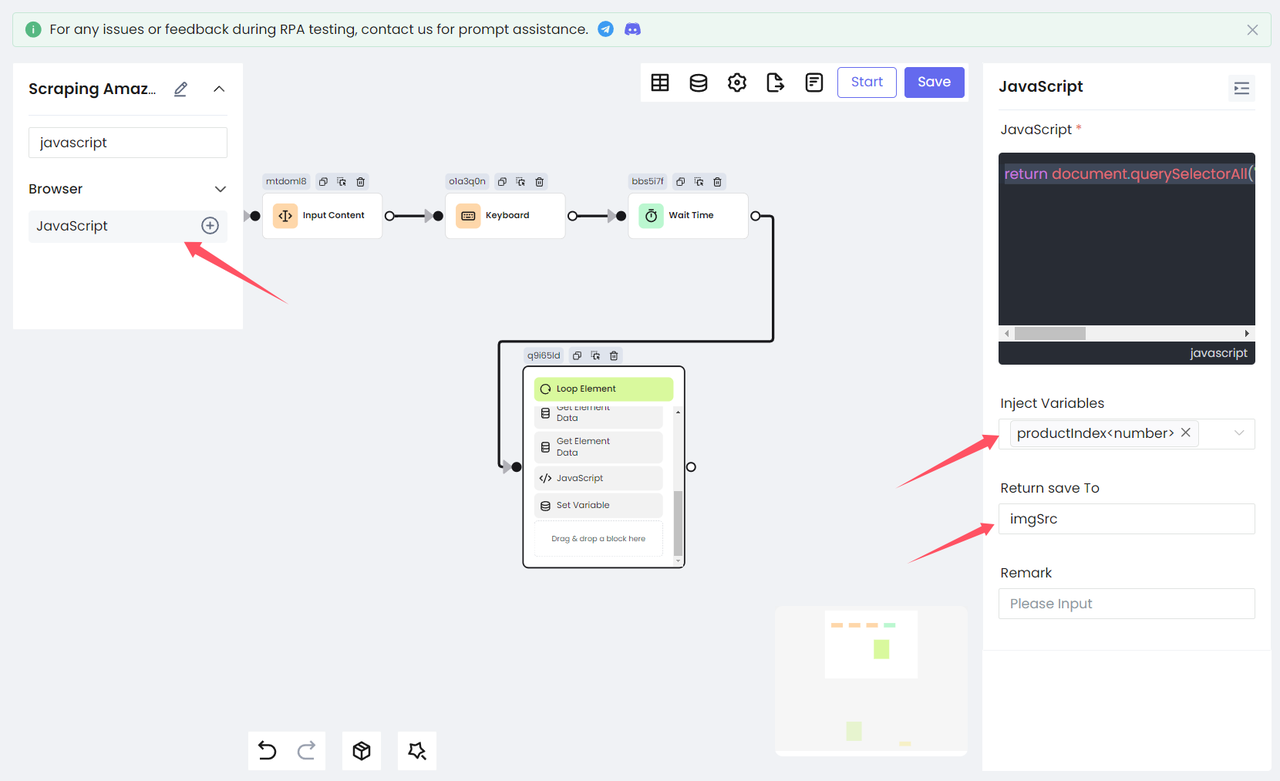
JavaScript
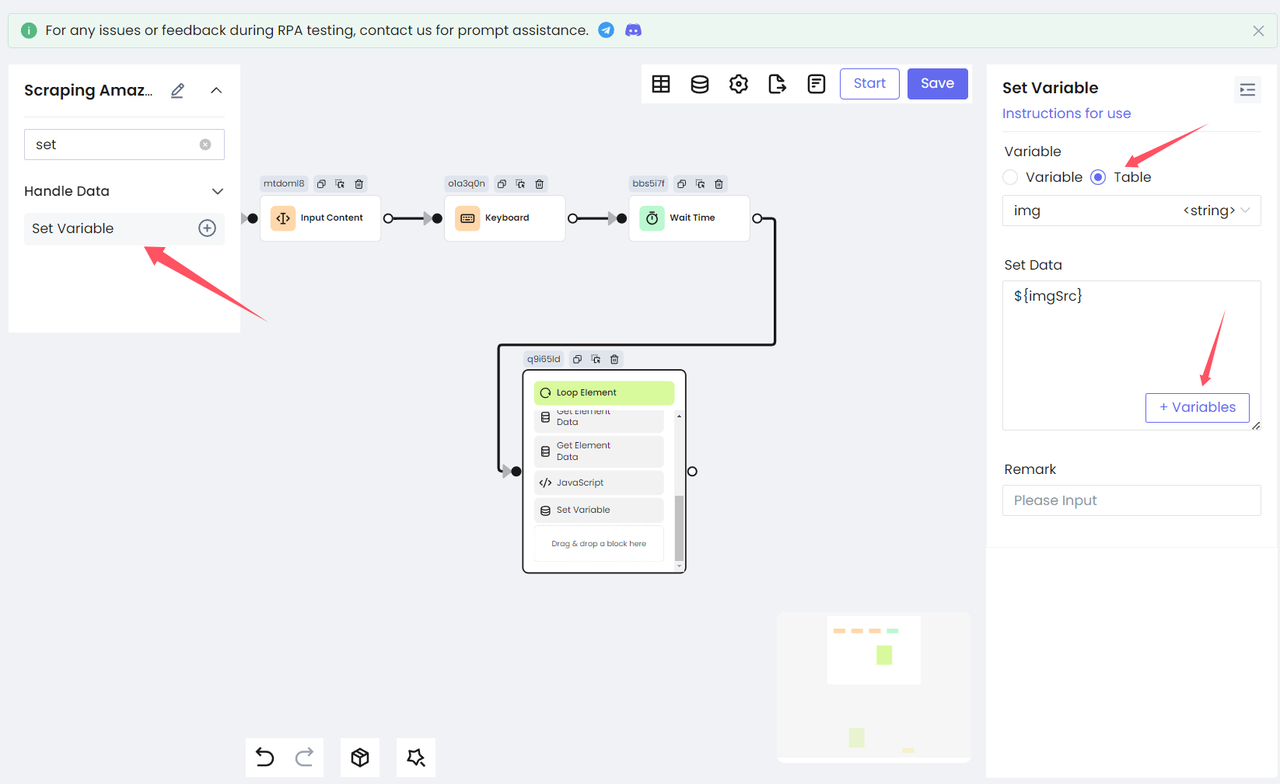
return document.querySelectorAll('[data-image-latency="s-product-image"]')[productIndex].getAttribute('src')Finally, we use the Set Variable node to store the variable imgSrc in the table:
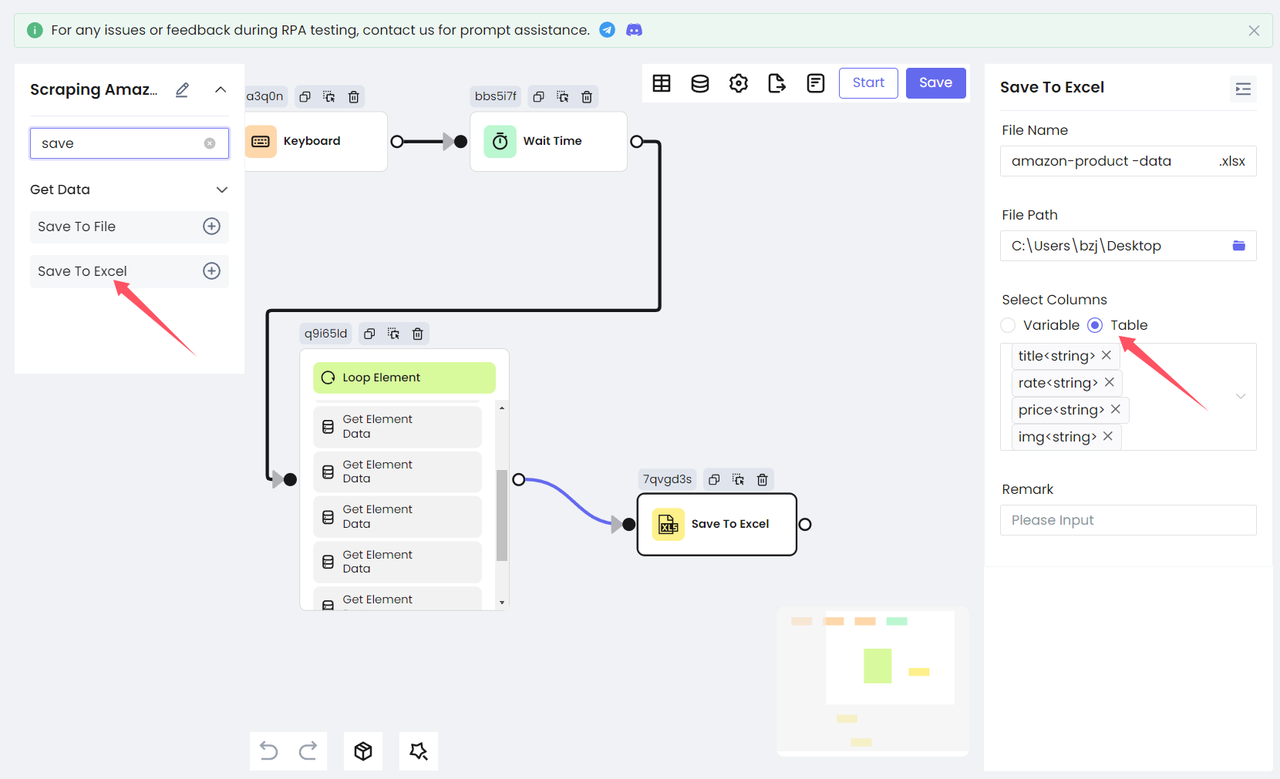
Step 5. Save the result
At this point, we have obtained all the data we want to collect, and it is time to save this data.
- Nstbrowser RPA provides two ways to save data:
Save To FileandSave To Excel.
Save To Fileprovides three file types for you to choose from .txt, .CSV, and .JSON.Save To Excelcan only save data to Excel files.
For easy viewing, we choose to save the collected data to Excel. Add the Save To Excel node, configure the file path and file name to be saved, select the table content to be saved, and you are done!
Execute RPA
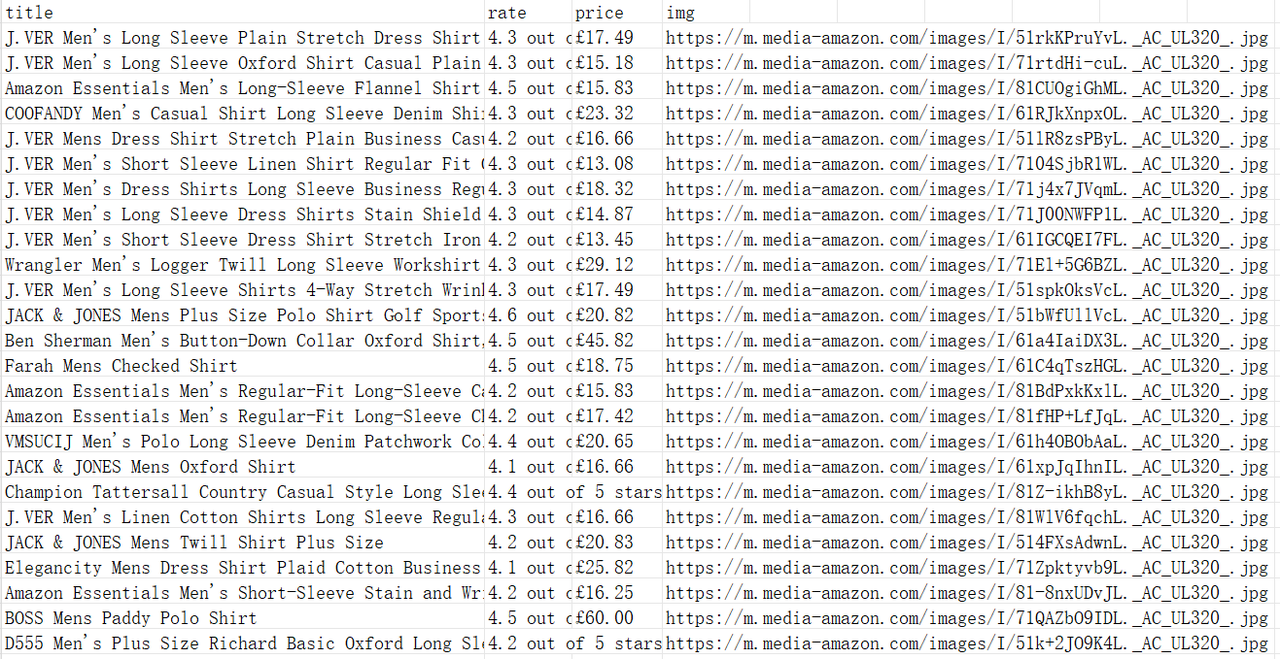
Save the workflow we configured first, then you can run it directly on the current page, or return to the previous page, create new tasks, and click the Run button to run it. At this point, we can start collecting Amazon's product data!
After the execution is completed, you can see the amazon-product-data.xlsx file generated on the desktop.
The Bottom Lines
The easiest way to scrape Amazon products is to build your own Amazon product scraper using Browserless. This most comprehensive tutorial article of 2024 clearly explains to you:
- The benefits of scraping Amazon products.
- The powerful functions of Browserless Amazon product scraper.
- How to create an easier scraper using Nstbrower's RPA.
Are you particularly interested in web data? Please check out our RPA marketplace. Nstbrowser has prepared 20 powerful RPA programs that can solve all your problems in all aspects.
If you have special needs for Browserless, data scraping, or automation, please contact us in time. We are ready to provide you with high-quality customized services.
Disclaimer: Any data and websites mentioned in this article are for demonstration purposes only. We firmly oppose illegal and infringing activities. If you have any questions or concerns, please contact us promptly.
More


