Browserless
Browserless Web Scraping: NodeJS in Playwright
What is Playwright? How does it scrape website with NodeJS? This blog is all about how to do Playwright web scraping with NodeJS. Besides, here you can find the secret of Browserless!
Aug 19, 2024Carlos Rivera
What Is Playwright?
Playwright is an open-source framework for web testing and automation. Based on Node.js and developed by Microsoft, it supports Chromium, Firefox, and WebKit through a single API. It can work across Windows, Linux, and macOS, and is compatible with TypeScript, JavaScript, Python, .NET, and Java.
What Are the Advantages of NodeJS in Playwright for Web Scraping?
Playwright is not just a tool but a comprehensive solution for web scraping in Node.js, combining power, flexibility, and efficiency to meet the most demanding requirements of modern web automation.
- Robust page interaction handling
- Automatic handling of dynamic content
- Resilience against anti-scraping techniques
In Node.js, the headless mode in Playwright is a huge benefit. It lets you run browsers without the visual interface, speeding up the scraping process and making it suitable for large-scale tasks.
Playwright handles complex web interactions well, such as loading dynamic content, managing user inputs, and dealing with asynchronous actions. This makes it perfect for scraping data from modern websites that rely heavily on JavaScript. The ability to intercept network requests is another strength. It gives you control over requests and responses, helping to bypass anti-scraping measures and fine-tune your scraping process.
What’s also great about Playwright is how easily it integrates with Node.js projects. You can smoothly incorporate it into your existing workflows and use it alongside other JavaScript or TypeScript libraries. Plus, since it works across Windows, Linux, and macOS, you can deploy your scraping scripts on different platforms without any hassle.
What Is Browserless?
Browserless is a cloud-based headless browser service designed by Nstbrowser for executing web operations and automation scripts without a graphical interface.
One of the key features of Nstbrowserless is its ability to bypass common roadblocks like CAPTCHAs and IP blocking, thanks to its integrated Anti-detect, Web Unblocker, and intelligent proxy systems. These tools ensure that your automation scripts run smoothly, even on websites with stringent security measures.
Browserless supports cloud container clusters, allowing you to scale your operations effortlessly. Whether you're running on Windows, Linux, or macOS, our platform provides a consistent, enterprise-level solution for all your web automation needs. It's designed to integrate seamlessly into your existing workflows, offering a robust and reliable environment for high-performance web operations.
Do you have any wonderful ideas and doubts about web scraping and Browserless?
Let's see what other developers are sharing on Discord and Telegram!
How to Do Web Scraping with Playwright and NodeJS?
Step1: Install and Set Up Playwright
At first, please ensure Node.js is installed on your system. If it's not, download and install the LTS version. After that, use npm, the Node.js package manager, to install Playwright.
Bash
npm init playwright@latestExecute the installation command and make the following selections to begin:
- Decide between TypeScript and JavaScript (TypeScript is the default).
- Name your test folder (it defaults to
testore2eif a test folder already exists). - Choose whether to add the GitHub Actions workflow to facilitate running tests on CI.
- Determine if you want to install the Playwright browser now (this is set to true by default, but you can also do it later manually using
npx playwright install).
Step2: Launch the browser with Playwright
Like a normal browser, Playwright can render JavaScript, images, etc. as well, so it can extract dynamically loaded data. The script is harder to detect and block because it simulates normal user behavior and is difficult to identify as an automated script.
JavaScript
import { chromium } from 'playwright';
const browser = await chromium.launch({ headless: false }); // Open the browser and create a new tab
const page = await browser.newPage();
await page.goto('https://developer.chrome.com/'); // Visit the specified URL
await page.setViewportSize({ width: 1080, height: 1024 }); // Set the viewport size
console.log('[Browser opened!]');
By default, Playwright operates in headless mode. In the provided code, we disable headless mode by setting headless: false, allowing you to visually test your script. The demo and the following examples don’t need async functions due to the "type": "module" setting in package.json, enabling ES module execution.
Step3: Starting crawling
We'll start with a basic web scraping task to quickly familiarize you with Playwright. Let’s extract reviews for the Apple AirPods Pro from Amazon!
Effective web scraping begins with analyzing the page. You need to identify where the data you want to extract is located. The browser's debug console can help us a lot:
After opening the web page, you need to open the debug console by pressing Ctrl + Shift + I (Windows/Linux) or Cmd + Option + I (Mac).
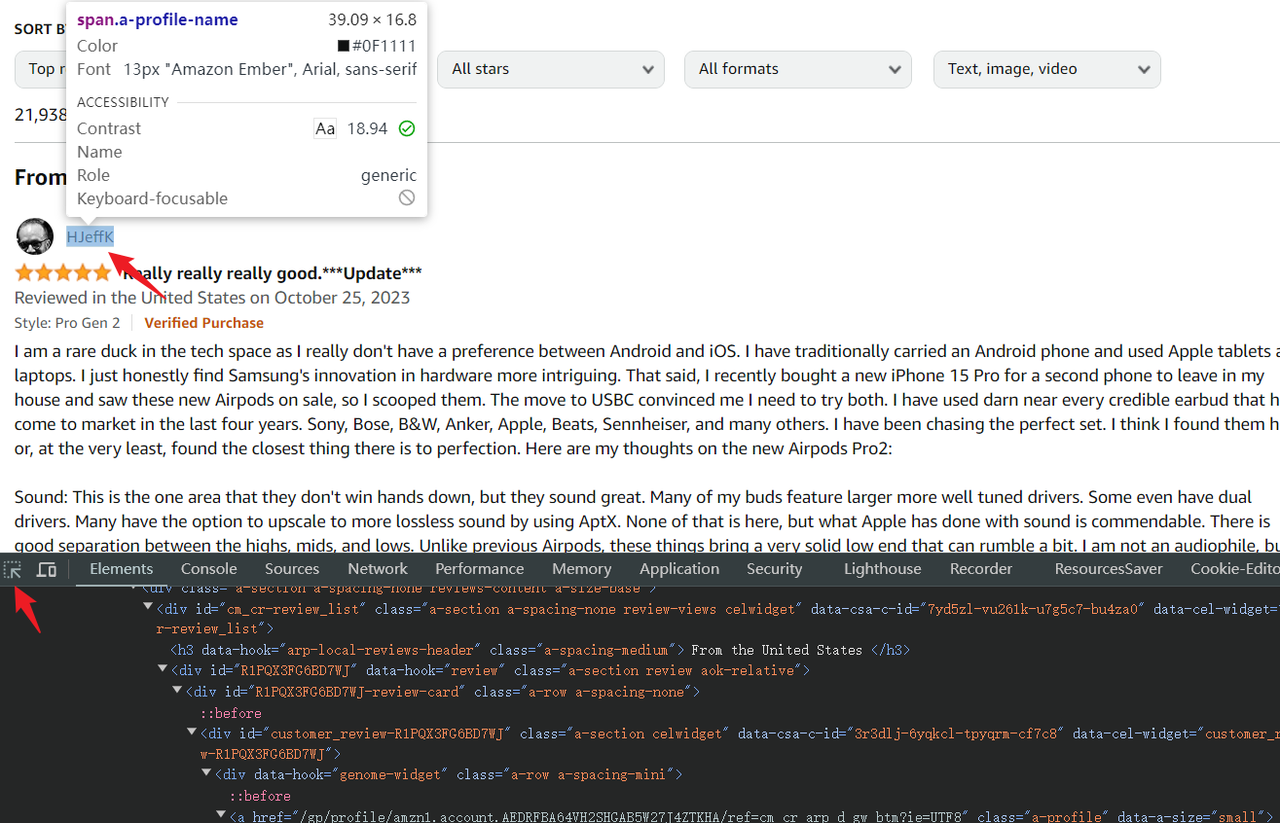
- Select the element picker at the top left of the console.
- Hover over the elements you want to scrape, and the corresponding HTML code will be highlighted in the console.
Playwright supports various methods for selecting elements, but using simple CSS selectors is often the easiest way to get started. The .devsite-search-field used earlier is an example of a CSS selector.
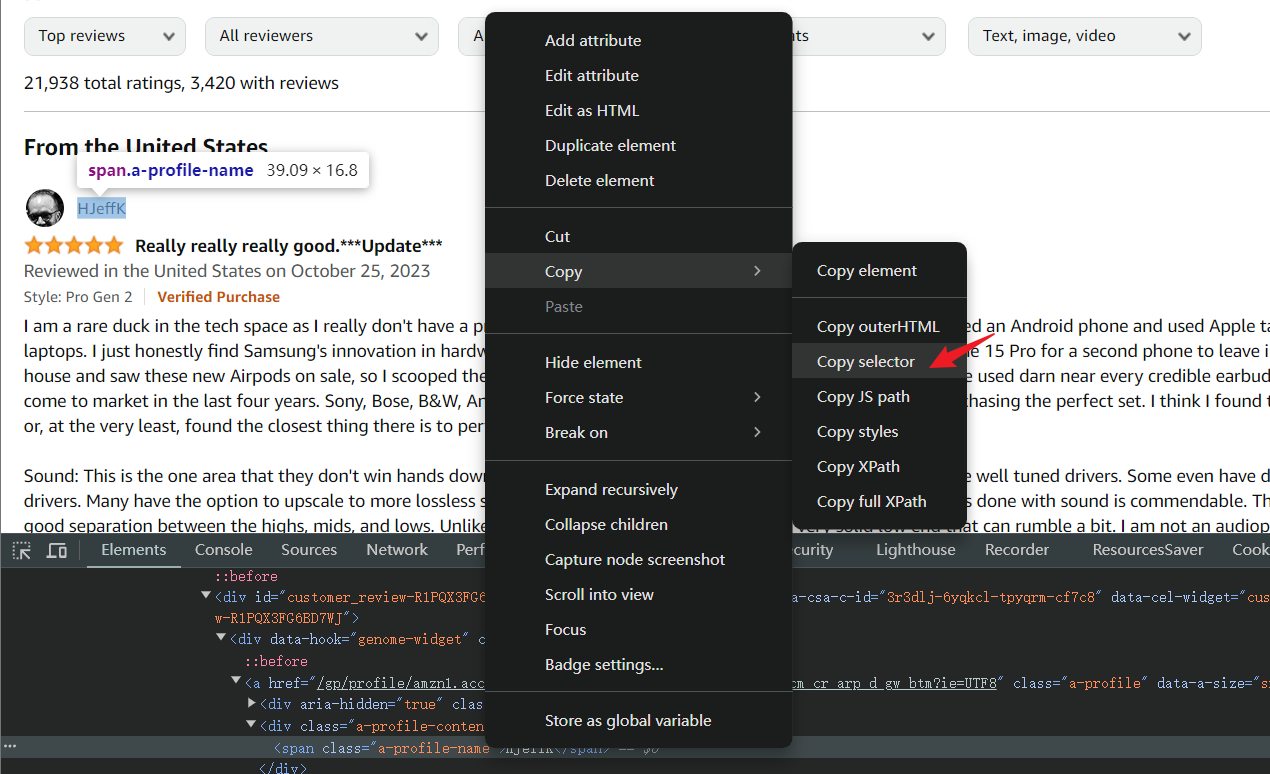
For complex CSS structures, the debug console can directly copy CSS selectors. Right-click the element HTML you want to grab, and open menu > Copy > Copy selector.
Now that the element selector is determined, we can use playwright to try to get the username I selected above.
JavaScript
import { chromium } from 'playwright';  // You can also use 'firefox' or 'webkit'
// Start a new browser instance
const browser = await chromium.launch();
// Create a new page
const page = await browser.newPage();
// Navigate to the specified URL
await page.goto('https://www.amazon.com/Apple-Generation-Cancelling-Transparency-Personalized/product-reviews/B0CHWRXH8B/ref=cm_cr_dp_d_show_all_btm?ie=UTF8&reviewerType=all_reviews');
// Wait for the node to load, up to 10 seconds
await page.waitForSelector('div[data-hook="genome-widget"] .a-profile-name', { timeout: 10000 });
// Extract the username
const username = await page.$eval('div[data-hook="genome-widget"] .a-profile-name', node => node.textContent);
console.log('[username]===>', username);
// Close the browser
await browser.close();
You can adjust the code to extract more than just a single username, such as retrieving a full list of comments:
- Utilize
page.waitForSelectorto ensure the review elements are fully loaded. - Use
page.$$to select all elements that match the specified selector.
Then, loop through the list of review elements and extract the necessary information from each one. The code provided will capture the title, rating, username, text content, and the data-src attribute from the avatar, which includes the avatar's URL.
As demonstrated, the code:
page.gototo navigate to the desired page.waitForSelectorto wait until the targeted node is correctly displayed.page.$evalto obtain the first matched element and extract specific attributes via a callback function.
JavaScript
await page.waitForSelector('div[data-hook="review"]');
const reviewList = await page.$$('div[data-hook="review"]');
Next, we need to traverse the list of review elements and get the required information from each review element.
In the following code, we can get the title, rating, username, and textContent of the content, as well as the data-src attribute value from the avatar element node, which is the URL address of the avatar.
JavaScript
for (const review of reviewList) {
  const title = await review.$eval(
    'a[data-hook="review-title"] > span:nth-of-type(2)',
    node => node.textContent,
  );
  const rate = await review.$eval(
    'i[data-hook="review-star-rating"] .a-icon-alt',
    node => node.textContent,
  );
  const username = await review.$eval(
    'div[data-hook="genome-widget"] .a-profile-name',
    node => node.textContent,
  );
  const avatar = await review.$eval(
    'div[data-hook="genome-widget"] .a-profile-avatar img',
    node => node.getAttribute('data-src'),
  );
  const content = await review.$eval(
    'span[data-hook="review-body"] span',
    node => node.textContent,
  );
  console.log('[log]===>', { title, rate, username, avatar, content });
}
Step 4: Export data
After running the above code, you should be able to see the output of log information in the terminal.
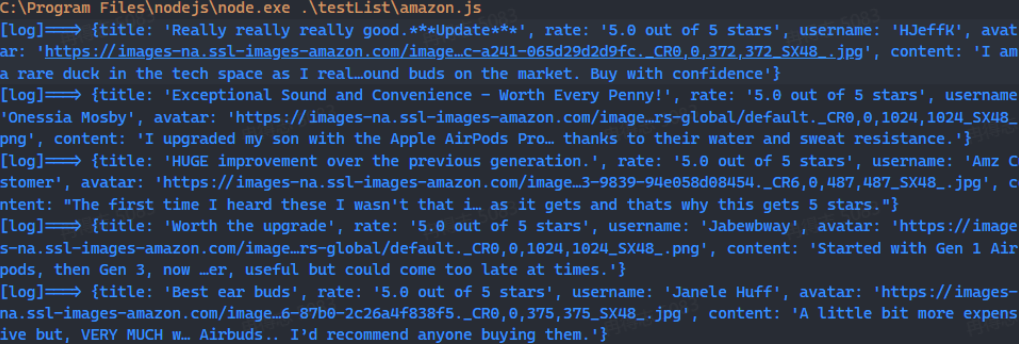
If you want to store this data further, you can use the basic Node.js module fs to write the data to a JSON file for subsequent data analysis. The following is a simple tool function:
JavaScript
import fs from 'fs';

// Save as a JSON file
function saveObjectToJson(obj, filename) {
  const jsonString = JSON.stringify(obj, null, 2);
  fs.writeFile(filename, jsonString, 'utf8', (err) => {
    err ? console.error(err) : console.log(`File saved successfully: ${filename}`);
  });
}
The complete code is as follows. After running, you can find the amazon_reviews_log.json file in the current script execution path, which records all the crawling results!
JavaScript
import { chromium } from 'playwright';
import fs from 'fs';
// Start the browser
const browser = await chromium.launch();
const page = await browser.newPage();
// Visit the page
await page.goto(
  `https://www.amazon.com/Apple-Generation-Cancelling-Transparency-Personalized/product-reviews/B0CHWRXH8B/ref=cm_cr_dp_d_show_all_btm?ie=UTF8&reviewerType=all_reviews`
);

// Wait for the review element to load
await page.waitForSelector('div[data-hook="review"]');
// Get all review elements
const reviewList = await page.$$('div[data-hook="review"]');
const reviewLog = [];

// Traverse the review element list
for (const review of reviewList) {
  const title = await review.$eval(
    'a[data-hook="review-title"] > span:nth-of-type(2)',
    node => node.textContent.trim()
  );
  const rate = await review.$eval(
    'i[data-hook="review-star-rating"] .a-icon-alt',
    node => node.textContent.trim()
  );
  const username = await review.$eval(
    'div[data-hook="genome-widget"] .a-profile-name',
    node => node.textContent.trim()
  );
  const avatar = await review.$eval(
    'div[data-hook="genome-widget"] .a-profile-avatar img',
    node => node.getAttribute('data-src')
  );
  const content = await review.$eval(
    'span[data-hook="review-body"] span',
    node => node.textContent.trim()
  );
  console.log('[log]===>', { title, rate, username, avatar, content });
  reviewLog.push({ title, rate, username, avatar, content });
}

// Save as JSON file
function saveObjectToJson(obj, filename) {
  const jsonString = JSON.stringify(obj, null, 2);
  fs.writeFile(filename, jsonString, 'utf8', (err) => {
    err ? console.error(err) : console.log(`File saved successfully: ${filename}`);
  });
}

saveObjectToJson(reviewLog, 'amazon_reviews_log.json');
await browser.close();
Use Playwright for other web operations
Click a button
Click a button with page.click and set a delay to make the operation more human-like. Here is a simple example.
JavaScript
import { chromium } from 'playwright'
const browser = await chromium.launch({ headless: false });
const page = await browser.newPage();
await page.goto('https://example.com/'); // Visit the specified URL
await page.waitForTimeout(3000)
await page.click('p > a', { delay: 200 })
Scroll the page
On page.evaluate, it is very convenient to set the position of the scroll bar by calling the Window API. Page.evaluate is a very useful API:
JavaScript
import { chromium } from 'playwright'
const browser = await chromium.launch({ headless: false });
const page = await browser.newPage();
await page.goto('https://www.nstbrowser.io/'); // Visit the specified URL

// Scroll to the bottom
await page.evaluate(() => {
  window.scrollTo(0, document.documentElement.scrollHeight);
});
Grab a list of elements
To grab multiple elements, we can use page.$$eval, which can get all elements that match the specified selector, and finally traverse these elements in the callback function to get specific properties.
JavaScript
import { chromium } from 'playwright'
// Start the browser
const browser = await chromium.launch();
const page = await browser.newPage();
await page.goto('https://news.ycombinator.com/');

await page.waitForSelector('.titleline > a')
// Grab the article title
const titles = await page.$$eval('.titleline > a', elements =>
  elements.map(el => el.innerText)
);
// Output the captured title
console.log('Article title:');
titles.forEach((title, index) => console.log(`${index + 1}: ${title}`));
Intercept HTTP requests
The page.route method is used to intercept requests on the page. '**/*' is a wildcard, which means matching all requests. Then all requests can be processed in the callback function. The parameter route is used to set whether the request is executed normally or interrupted, and can also be used to rewrite the response.
JavaScript
import { chromium } from 'playwright'
const browser = await chromium.launch({ headless: false });
const page = await browser.newPage();

await page.route('**/*', (route) => {
  const request = route.request();
  // Intercept and block font requests
  if (request.url().includes('https://fonts.gstatic.com/')) {
    route.fulfill({
      status: 404,
      contentType: 'image/x-icon',
      body: ''
    });
    console.log('Icon request blocked');
  // Intercept and block stylesheet requests
  } else if (request.resourceType() === 'stylesheet') {
    route.abort();
    console.log('Stylesheet request blocked');
  // Intercept and block image requests
  } else if (request.resourceType() === 'image') {
    route.abort();
    console.log('Image request blocked');
  // Allow other requests to continue
  } else {
    route.continue();
  }
});

await page.goto('https://www.youtube.com/');
Screenshot
Playwright provides an out-of-the-box screenshot API, which is a very practical feature. You can control the quality of the screenshot file through quality and crop the image through a clip. If you have requirements for the screenshot ratio, you can set the viewport to achieve it.
JavaScript
import { chromium } from 'playwright';

const browser = await chromium.launch({ viewport: { width: 1920, height: 1080 } });
const page = await browser.newPage();
await page.goto('https://www.youtube.com/');

// Capture the entire page
await page.screenshot({ path: 'screenshot1.png' });
// Capture a JPEG image, set the quality to 50
await page.screenshot({ path: 'screenshot2.jpeg', quality: 50 });
// Crop the image, specify the crop area
await page.screenshot({ path: 'screenshot3.jpeg', clip: { x: 0, y: 0, width: 150, height: 150 } });
console.log('Screenshot saved');
await browser.close();
Nstbrowser nodes can achieve all of them!
Certainly, you can accomplish all these tasks using various tools. For instance, the Nstbrowser RPA can speed up your web scraping process!
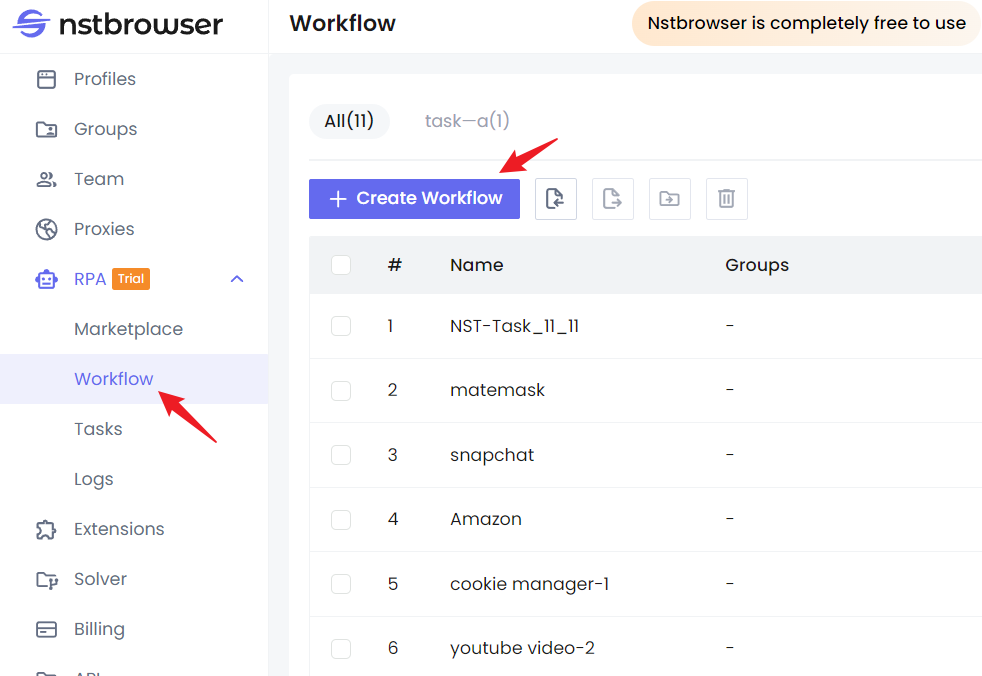
Step 1. Visit the Nstbrowser homepage, then navigate to RPA/Workflow > create workflow.
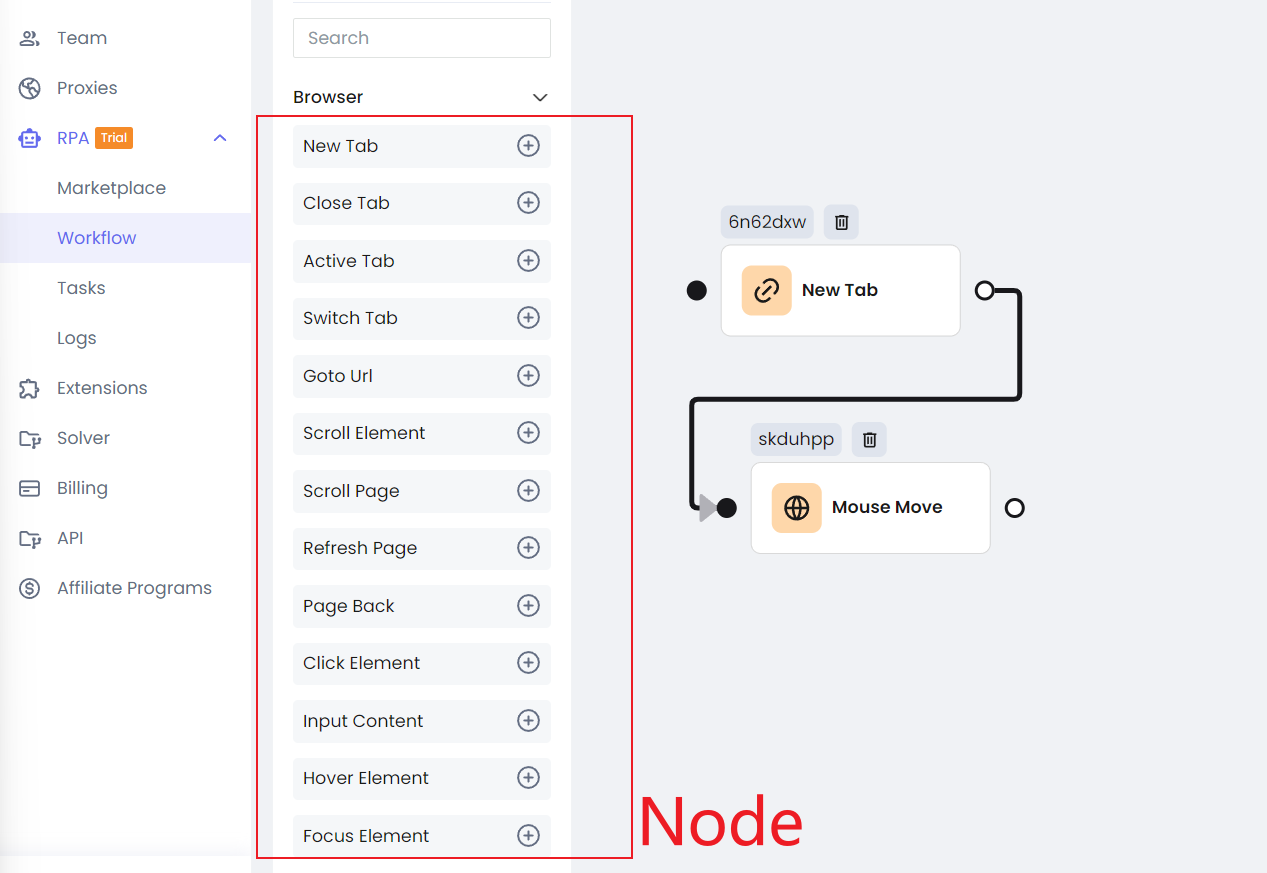
Step 2. Once you're on the workflow editing page, you can easily replicate the above functions by simply dragging and dropping with your mouse.
The Nodes on the left cover almost all your web scraping and automation needs, and they align closely with the Playwright API.
You can adjust the execution order of these nodes by linking them, similar to how you execute JavaScript async code. If you're familiar with Playwright, you'll find it easy to start using Nstbrowser's RPA feature—what you see is what you get.
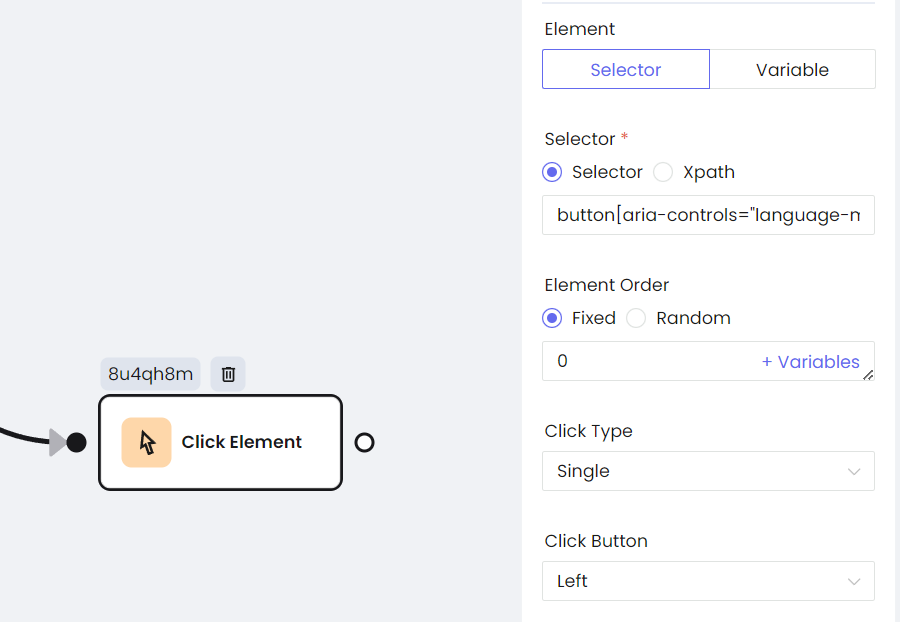
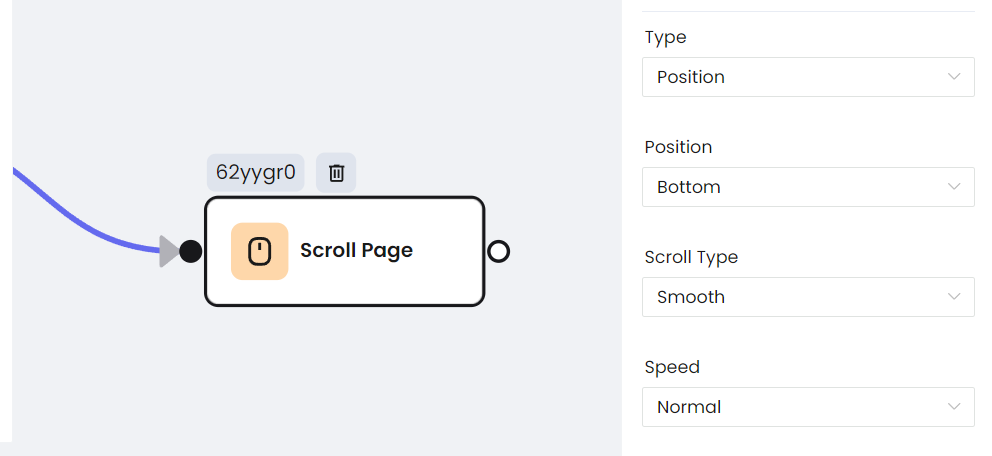
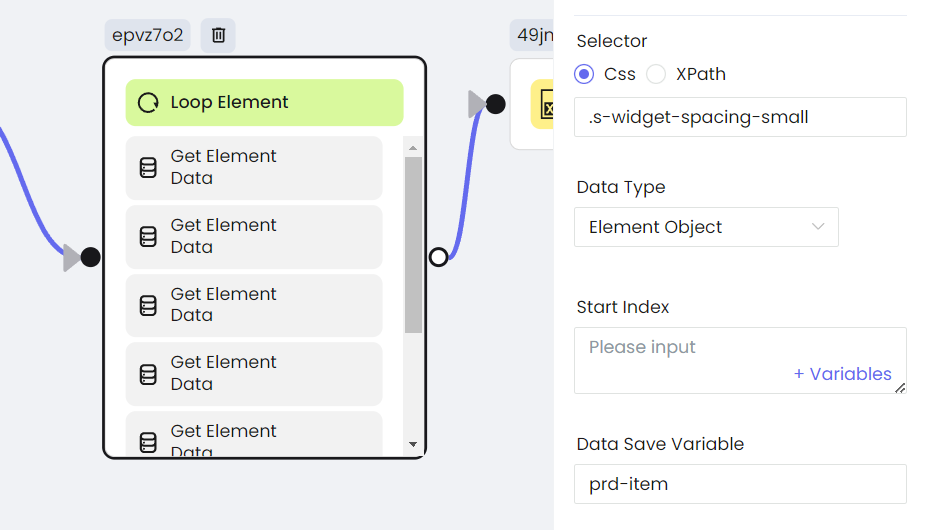
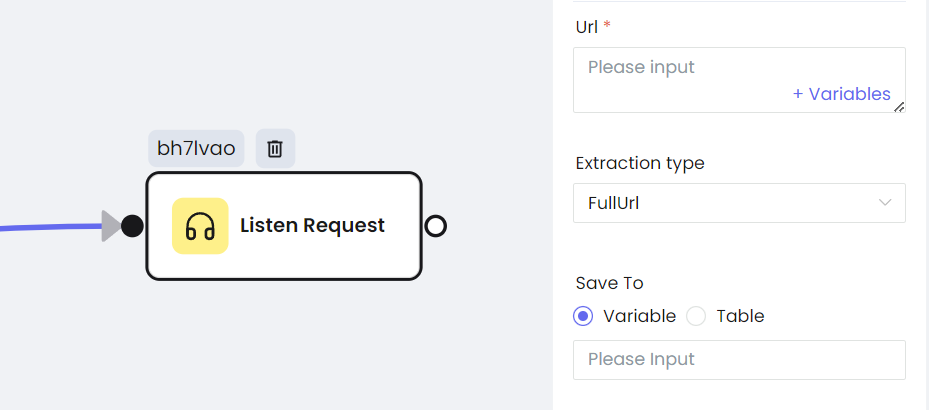
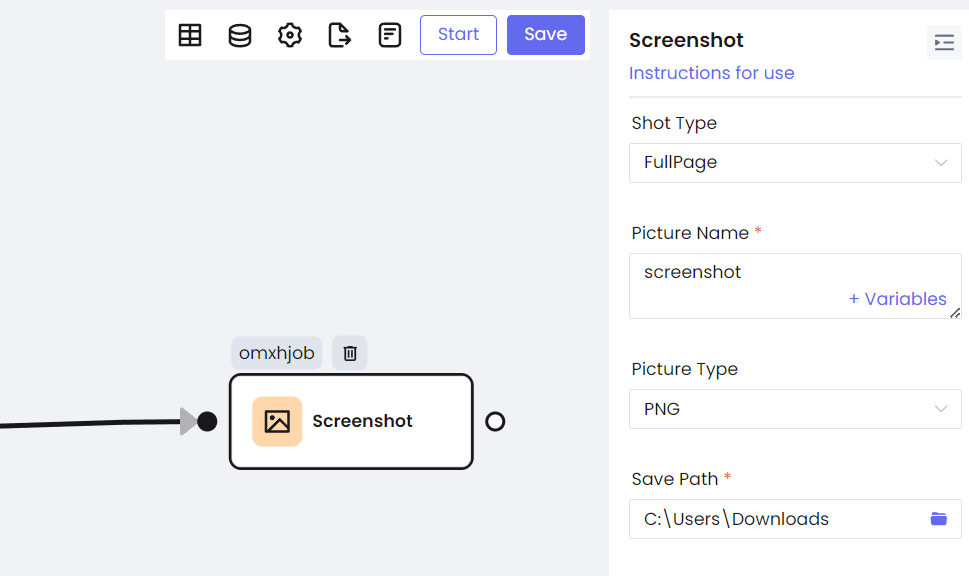
Step 3. Each Node can be individually configured, with the settings closely matching those of Playwright.
- Click the button
- Scroll Page
- Scrape Element List
- Intercept HTTP Requests
- Screenshot
Playwright vs. Puppeteer vs. Selenium
| Criteria | Playwright | Puppeteer | Selenium |
|---|---|---|---|
| Browser Support | Chromium, Firefox, and WebKit | Chromium-based browsers | Chrome, Firefox, Safari, Internet Explorer, and Edge |
| Language Support | TypeScript, JavaScript, Python, .NET, and Java | Node.js | Java, Python, C#, JavaScript, Ruby, Perl, PHP, Typescript |
| Operating system | Windows, macOS, Linux | Windows and OS X | Windows, macOS, Linux, Solaris |
| Community and Ecosystem | Growing community with solid support and ongoing development by Microsoft | Backed by Google with a strong community, especially for those focused on Chromium | Established, with a large, active community and extensive ecosystem, including plugins and integrations |
| CI/CD integration support | Yes | Yes | Yes |
| Record and Playback support | In Chrome DevTools’ Sources panel | Playwright CodeGen | Selenium IDE |
| Web Scraping Difference | With modern features and speed, good for scraping across different browsers | Great in Chrome, and it's quick | Versatile for web scraping but may be slower |
| Headless Mode | Supports headless mode for all supported browsers | supports headless mode but only for Chromium-based browsers | Supports headless mode, but implementation varies depending on the browser driver |
| Screenshots | PDF and image capture, especially in Chromium | PDF and image capture, easy-to-use | No built-in PDF capture |
Final Thoughts
Playwright is very powerful!
It provides a powerful and versatile web scraping toolkit. In addition, Playwright's excellent documentation and growing community bring great convenience to your automation tasks.
In this blog, you have a deeper understanding of Playwright:
- Advantages of Playwright web scraping.
- Use NodeJS efficiently in Playwright.
- Use Playwright to complete other operations.
Browserless of Nstbrowser is full of powerful features in Docker. Want to free up your storage and get rid of restrictions on local devices? Achieving fully managed in the Cloud with Nstbrowser Now!
More


