Other Services
Quick Start: Create a Profile and Configure a Proxy for a Stable Browser Environment
Learn how to create a Profile in Nstbrowser, configure an Nstproxy ISP proxy, launch an isolated browser environment, and share the Profile through team management to help teams build a safer and more stable account environment.
Jul 08, 2026Robin Brown
TL;DR
After creating a Profile in Nstbrowser, you can give each account an isolated browser environment and bind it to an Nstproxy ISP proxy to keep the fixed IP, timezone, language, and login status consistent. For team use, administrators can create permission groups through the Team feature, invite members, and authorize specific Profile groups. This allows team members to collaborate in the same stable environment instead of directly sharing account passwords.
An Nstbrowser Profile creates an isolated and stable browser environment for an account. Each Profile can have its own cookies, cache, browser fingerprint, timezone, language, screen resolution, and proxy settings.
If you need long-term access to international platforms, manage multiple accounts, or share one account with team members, create a dedicated Profile first and pair it with an Nstproxy ISP proxy. This helps the account maintain a consistent browser environment and a fixed network exit over time.
This guide walks you through the full process of creating a Profile, configuring a proxy, launching the browser environment, and sharing it with your team.
Workflow Overview
| Stage | What to Do | Goal |
|---|---|---|
| Create Profile | Create a new Profile and set the name, OS type, and browser kernel | Build an isolated browser environment |
| Set Basic Parameters | Configure timezone, language, resolution, and region-related settings | Match the browser environment with the account region |
| Configure Proxy | Enter Nstproxy ISP proxy details and test the connection | Bind a fixed network exit |
| Launch and Use | Launch the Profile and log in to the target platform | Keep a stable session and login status |
| Share With Team | Create a team, permission group, and authorized Profile group | Let members collaborate in the same environment |
1. Create a Profile
Step 1: Open Nstbrowser and Click "New Profile"
Open the Nstbrowser client and go to the Profile management page.
Click New Profile to start creating a new browser environment.
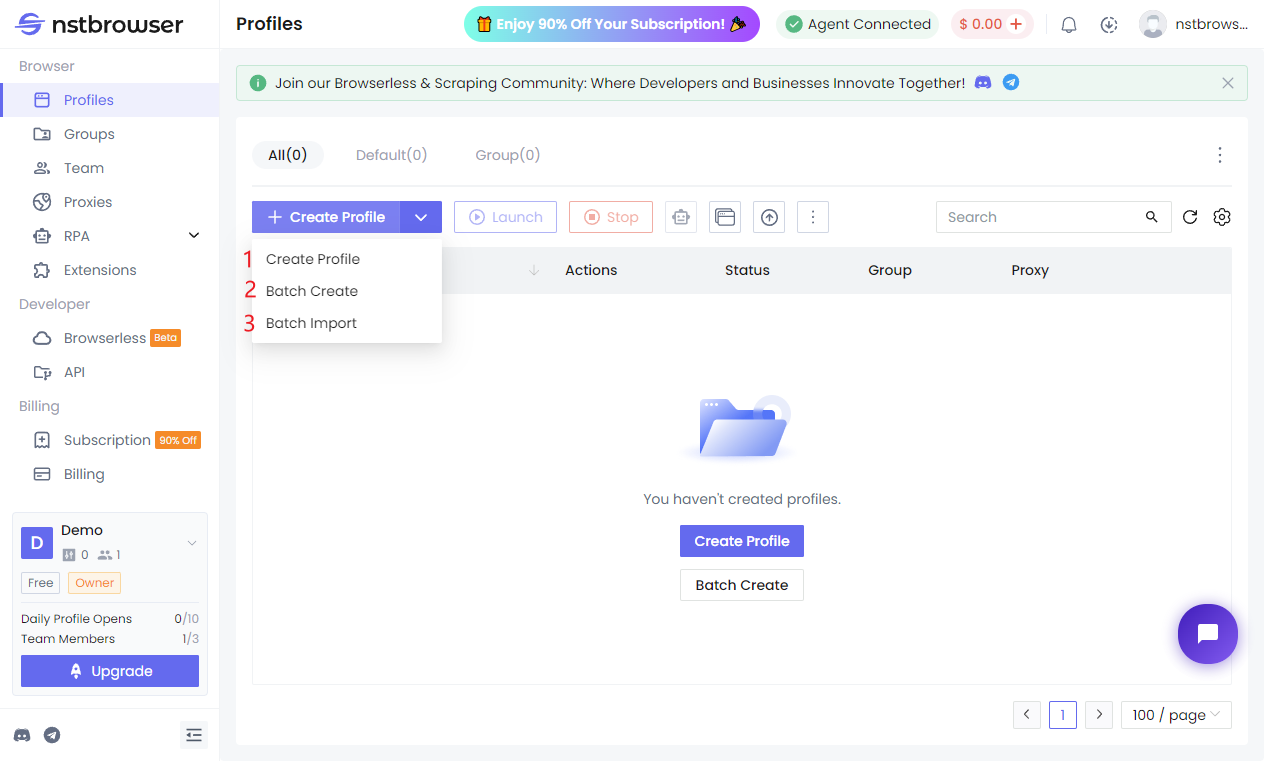
Step 2: Complete the Basic Configuration
1. Name the Profile based on its use case, such as:
- Claude-US-01
- Team-SaaS-Profile
- Amazon-Store-01
Clear naming makes future management easier, especially for multi-account operations or team collaboration.
2. Basic configuration includes:
- Profile group: default value is default
- Startup URL: the URL that opens automatically when the browser launches
- Number of Profiles to create in batch
Creation mode notes:
- Advanced creation: creates only 1 environment
- Batch creation: creates multiple environments, up to 500 at a time
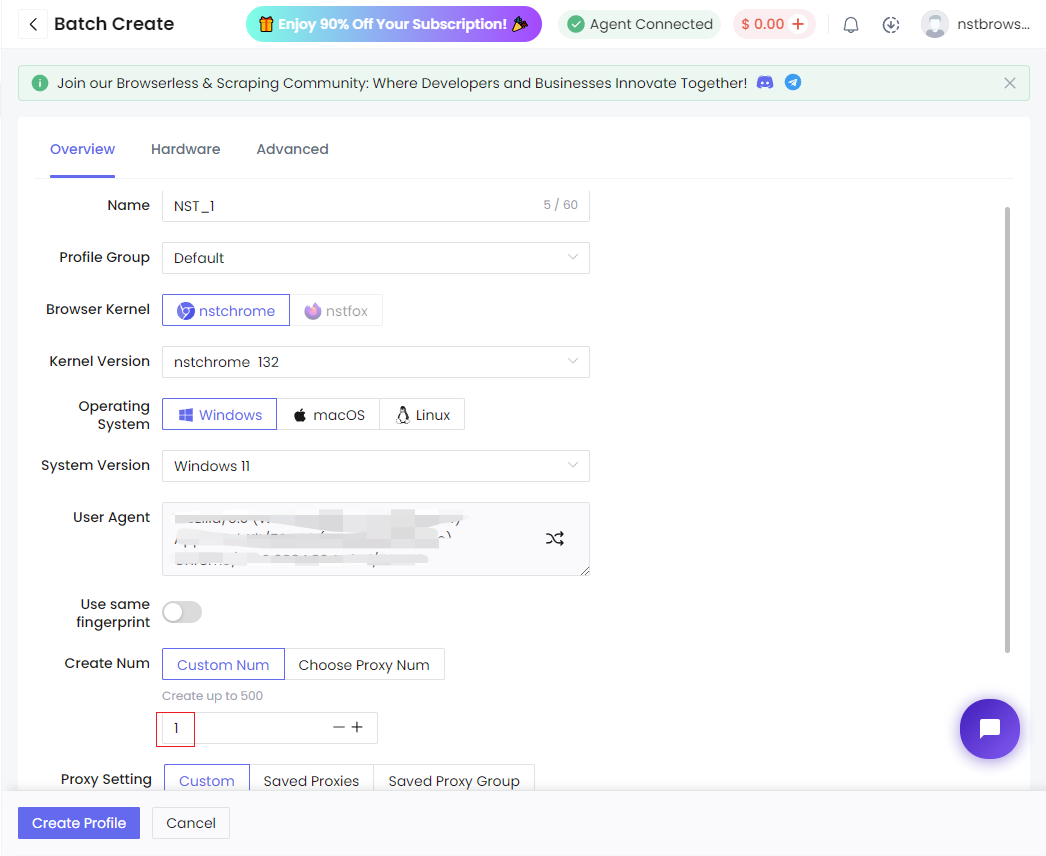
3. Select the OS Type and Browser Kernel Version
After entering the Profile creation page, select the OS type and browser kernel version based on your needs.
If you do not have special requirements, choose a common OS type and a stable version. For long-term account use, avoid frequently changing the OS type or browser kernel version, as frequent changes can make the account environment look unstable.
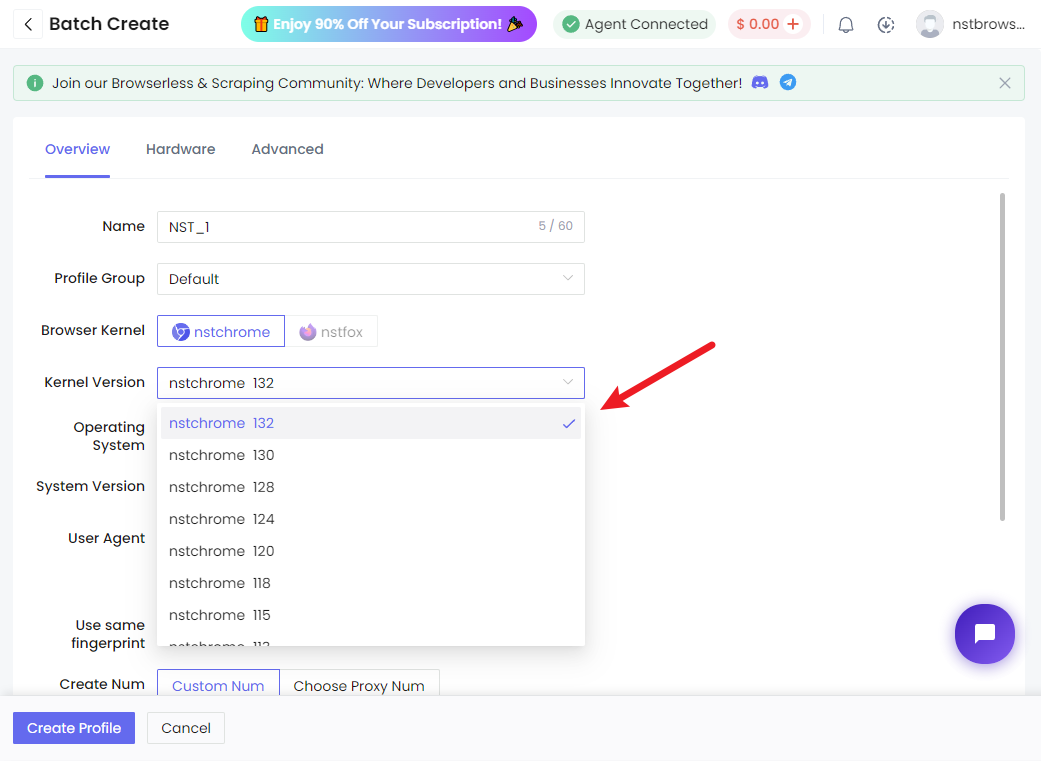
Step 3: Set Basic Parameters
Continue setting the Profile's basic parameters, including:
- Timezone
- Language
- Screen resolution
- Region-related parameters
- Other browser environment parameters
These parameters should match the proxy IP location as closely as possible.
For example, if you use a US ISP proxy, the Profile's timezone and language should also match a US environment where appropriate. If the proxy is in the UK, Germany, Japan, or Singapore, configure the region parameters accordingly.
This helps reduce conflicts where the IP appears to be in one region while the browser environment looks like another.
2. Configure the Proxy
Step 4: Choose the Protocol Type in Proxy Settings
On the Profile creation page, find the proxy settings area.
Choose the protocol that matches the proxy you purchased. Common protocols include:
- HTTP
- SOCKS5
Use the protocol shown in your Nstproxy dashboard as the source of truth.
Step 5: Enter the Nstproxy ISP Proxy Details
Log in to the Nstproxy dashboard, find the ISP proxy node you purchased, and copy the proxy details.
In the Nstbrowser proxy settings area, choose Custom, then enter your ISP proxy information. You will usually need:
- IP / Host
- Port
- Username
- Password
- Proxy type / Protocol
Be careful not to copy extra spaces, and do not miss uppercase letters, lowercase letters, or special characters. The username and password must exactly match what is shown in the Nstproxy dashboard.
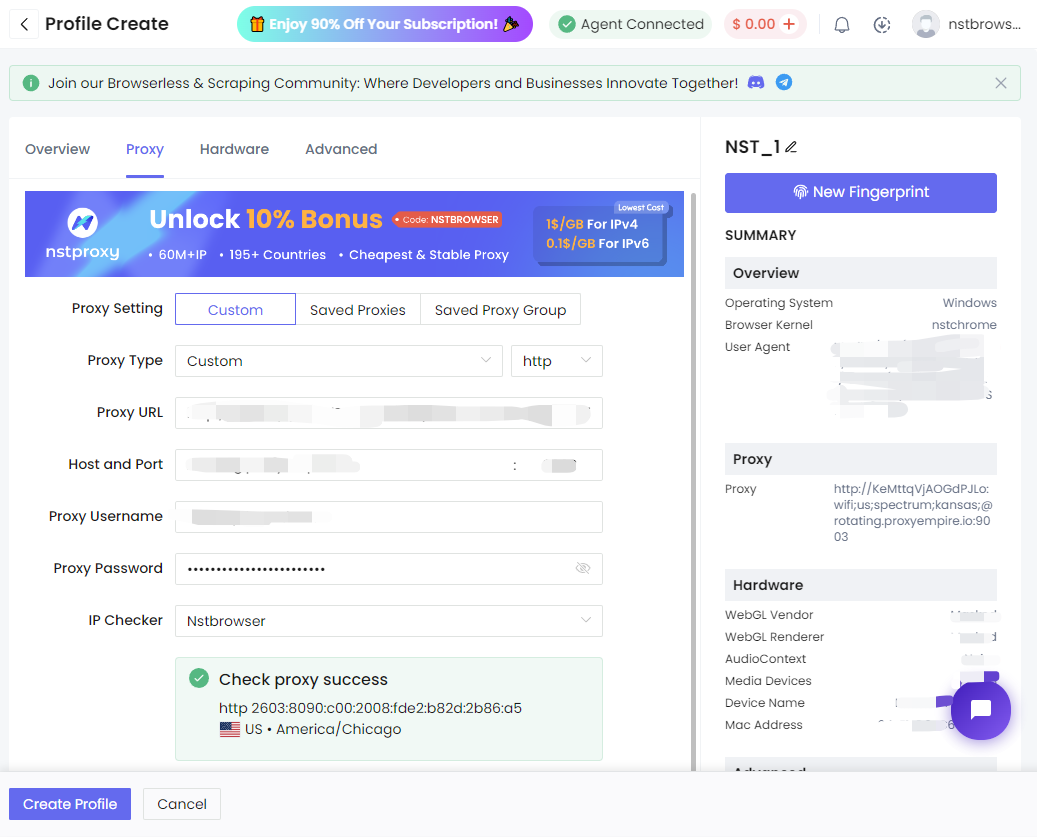
Step 6: Click "Detect Proxy" to Confirm the Connection
After entering the proxy details, click Check Proxy.
If the configuration is correct, the system will show that the connection succeeded and may return the current IP, region, or latency.
If detection fails, check the following first:
- Whether IP / Host is correct.
- Whether Port is correct.
- Whether Username and Password are complete.
- Whether the protocol type is correct.
- Whether the Nstproxy ISP node is still active.
- Whether your local network can connect normally.
Step 7: Save the Profile
After the proxy test succeeds, click Save.
Once saved, the Profile keeps the current browser environment parameters and proxy configuration. Every time you launch this Profile later, it will open with the same configuration.
3. Launch and Use the Profile
Step 8: Click "Launch" to Open the Profile
Return to the Profile management page, find the Profile you just created, and click Launch.
Nstbrowser will open an isolated browser window. This window is the dedicated browser environment for that Profile.
Step 9: Log In and Use the Target Platform in This Window
Open the target platform in the launched window and log in as usual.
All actions related to this account should be completed inside this Profile. Avoid logging in with an ordinary browser today, another Profile tomorrow, and a different device the day after.
For platforms, a consistent browser environment and network exit are more stable over time.
Step 10: Close the Window After Use
After finishing your work, simply close the Profile browser window.
The Profile's cookies, cache, login status, and environment configuration will be saved automatically. The next time you launch the same Profile, you can continue from the previous login environment.
4. Share the Profile With Your Team
If team members need to use the same Profile, use Nstbrowser team management to authorize access instead of directly sharing account passwords.
Step 11: Create or Enter a Team
Click the current Team name in the lower-left corner of Nstbrowser to enter the team management page.
If you do not have a team yet, click Create new team. After creating a team, the administrator can manage members, Profiles, permissions, and accessible environment groups in one place.
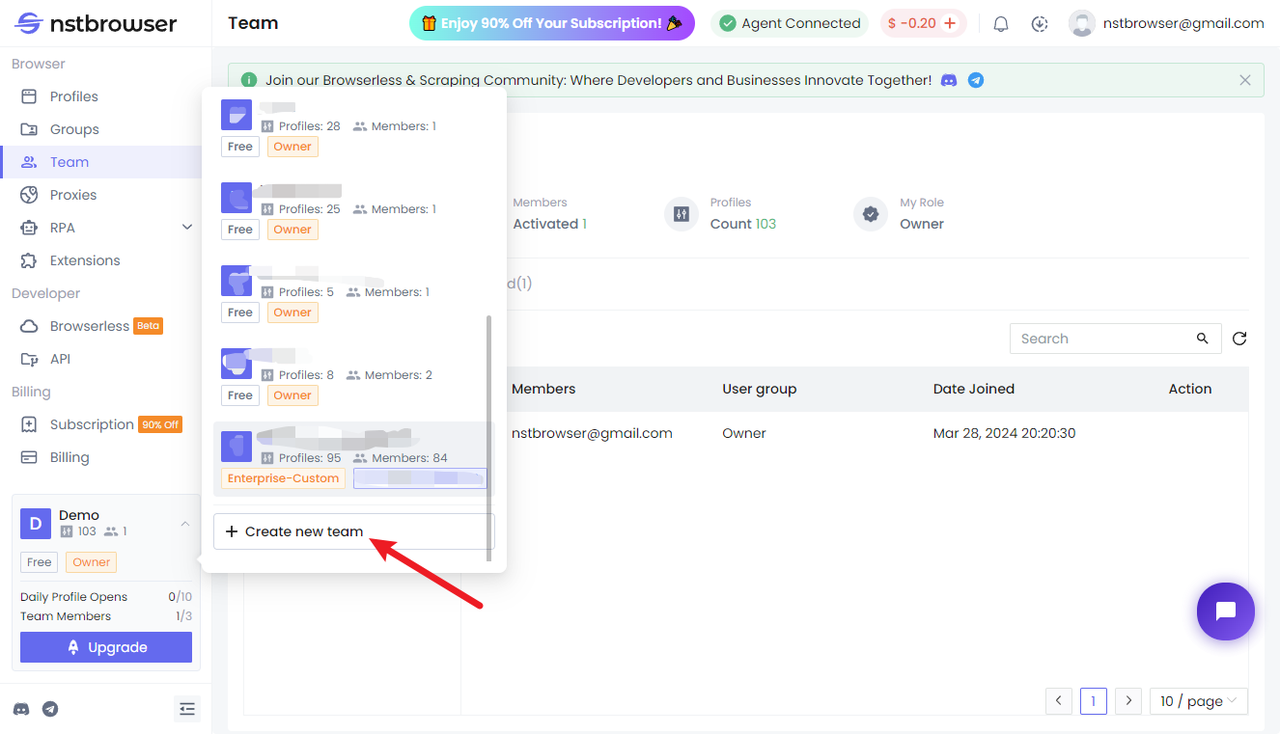
Step 12: Create a Member Permission Group
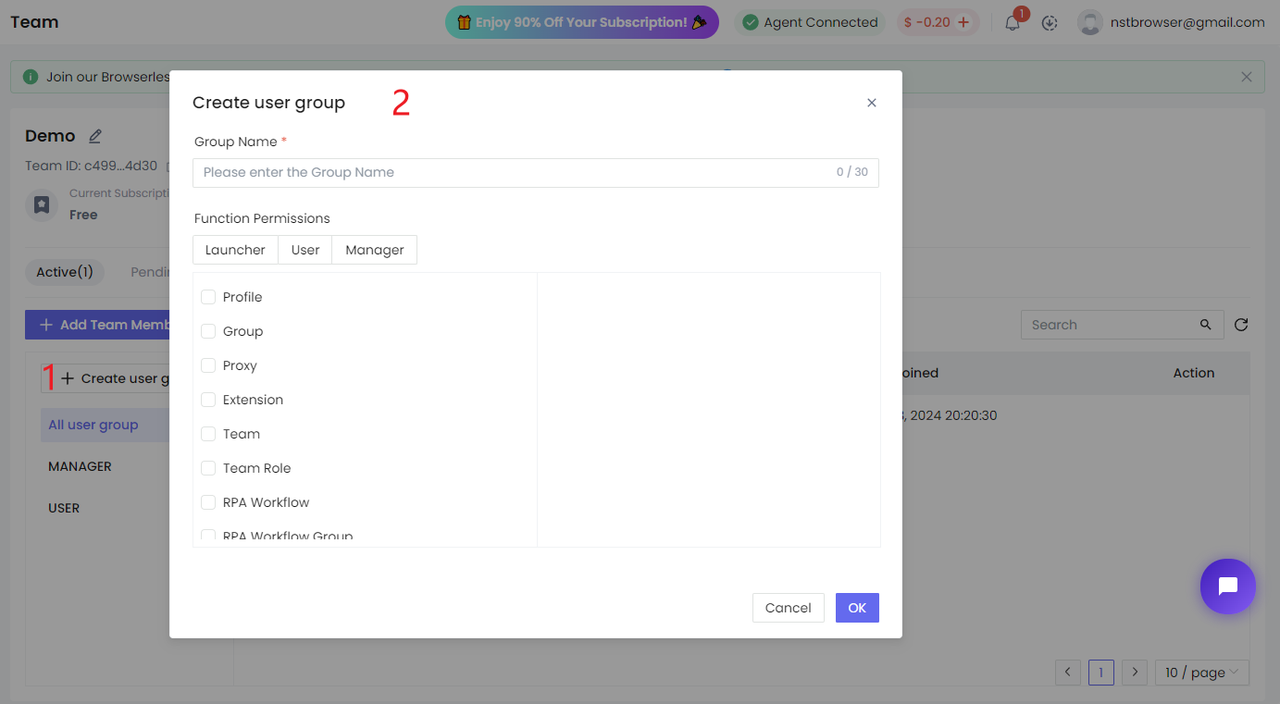
On the Team page, click Create user group to create a permission group.
If members only need to use configured Profiles, grant only the necessary permissions, such as viewing and launching Profiles. This helps prevent members from accidentally changing proxy, fingerprint, or cookie settings.
Step 13: Invite Members and Authorize Profile Groups
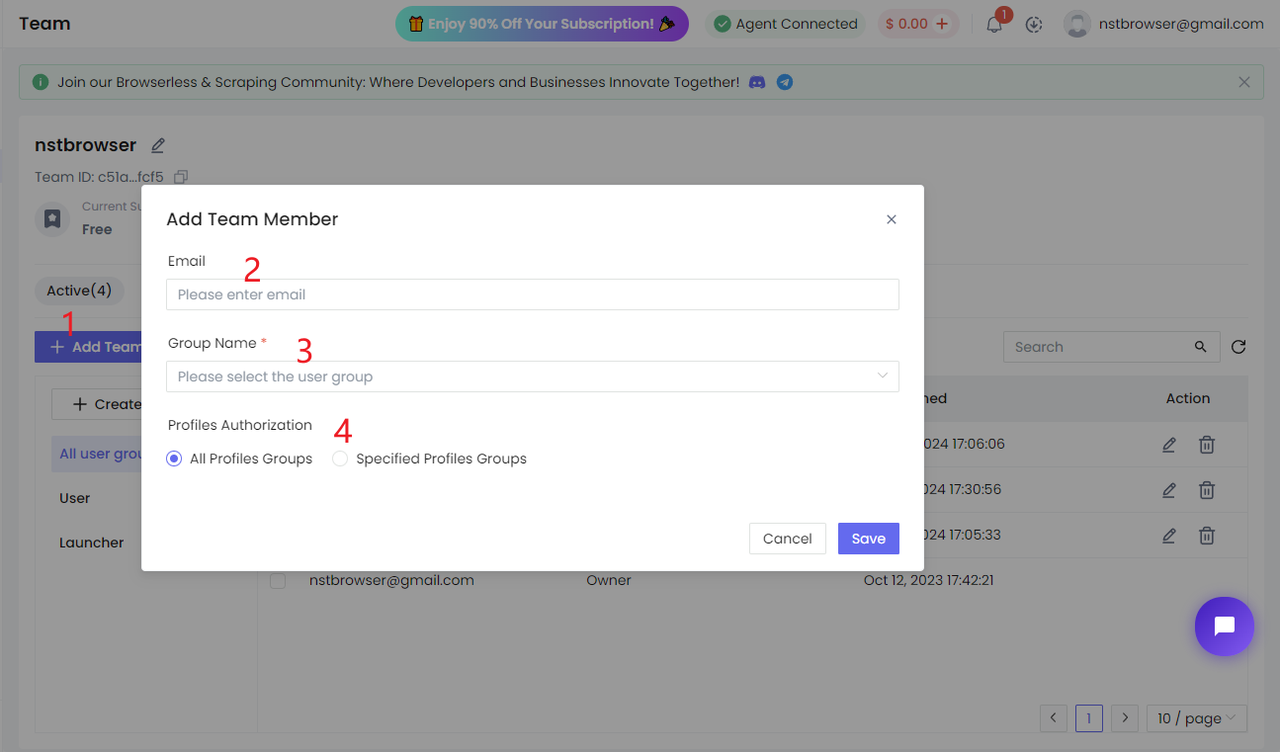
Click Add Team Member, enter the member's email address, select the correct permission group, choose the Profile groups the member can access, and click Save.
Note: Members must have both operation permissions and Profile group authorization before they can see and use the corresponding Profiles.
Step 14: Members Log In and Use the Profile
After accepting the invitation and logging in to Nstbrowser, members can see the authorized environment groups in the Profile list.
After clicking Launch, members can use the same Profile environment. This is more stable than directly sharing account passwords and can reduce abnormal risk caused by multiple devices and multiple browser environments.
5. Notes and Best Practices
To keep the Profile environment stable, follow these rules.
1. Do Not Casually Change Configured Profile Fingerprint Parameters
After a Profile is created and used stably, avoid frequently changing parameters such as OS type, browser kernel, timezone, language, and resolution. Frequent changes can make the account environment look unnatural.
2. Make Sure the Proxy Stays Available
If you use an Nstproxy ISP proxy, it can usually remain fixed over the long term without frequent replacement. Just confirm regularly that the proxy package is active and the node connection is normal.
3. Complete All Account Actions Inside the Profile
Do not log in to the same account outside the Profile. Otherwise, the platform may see the same account appearing across different devices, browsers, and network environments.
4. Use One Profile for One Account or One Fixed Business Scenario
Do not mix unrelated accounts in the same Profile. For multi-account operations, it is better to use one account, one Profile, and one dedicated proxy.
5. Avoid Sensitive Actions by Multiple Users at the Same Time
If multiple team members share one Profile, avoid simultaneous sensitive actions such as editing profile information, binding email addresses, changing passwords, making payments, or performing high-risk operations. Even for light viewing and basic tasks, internal team rules are recommended.
6. FAQ
1. Can I Modify Profile Parameters After Creation?
Yes, but frequent changes are not recommended. For long-term accounts, stability is more important than change. If an account has been used in one Profile for a long time, keep the original parameters whenever possible.
2. Why Should Basic Parameters Match the Proxy IP Location?
Platforms may evaluate IP, timezone, language, region, and browser environment together. If the IP is in the United States but the timezone and language clearly point to another region, it may create abnormal signals.
3. What Should I Do if Proxy Detection Fails?
First check whether the protocol type, IP, port, username, and password are correct. Then confirm that the Nstproxy ISP node is active and your local network is working. If it still fails, copy the proxy details again or contact support.
4. After Sharing a Profile, Can Team Members See the Account Password?
In most cases, members use the already logged-in environment through Profile authorization and do not need to know the account password. What they can see depends on the platform page and team permission settings. Administrators should manage account credentials centrally.
5. Can One Profile Be Used for Multiple Accounts?
It is not recommended. One Profile should ideally correspond to one account or one fixed business scenario. Mixing multiple accounts in one Profile can cause cookies, cache, login status, and environment signals to become messy.
Summary
The full workflow for creating and sharing a Profile in Nstbrowser is:
- Create a new Profile.
- Select the OS type and browser kernel.
- Set basic parameters that match the proxy region.
- Enter Nstproxy ISP proxy details.
- Detect the proxy and save the Profile.
- Launch the Profile and log in to the target platform.
- Authorize team members to use the Profile.
This gives the account an isolated browser environment, fixed network exit, and stable session, making it better suited for long-term use, multi-account management, and team collaboration.
Download Nstbrowser, create your first team shared Profile, and start building a safer and more stable account environment.
More