
Browserless
Headless Browser Testing: How to Do It Using Puppeteer and Browserless?
Puppeteer headless browser makes everything easy. Find the powerful functions and steps to use Puppeteer headless mode with Browserless in this log!
Oct 12, 2024Robin Brown
What is Headless Browser Testing?
Headless browser testing generally refers to an object or thing without a head, and in the context of a browser, it refers to a browser simulation without a UI. Headless browser automation uses a web browser for end-to-end testing without loading the browser's UI.
- Headless mode is a feature that allows the execution of a full version of a browser while controlling it programmatically.
- They are executed through a command line interface or using network communication. This means it can be used in a server without graphics or a display, and Selenium tests will still run!
- When the web page is not rendered on the screen, and the tests are executed without UI interaction, the execution speed is faster than real browser automation.
Functions of Puppeteer
Some of the main features of Puppeteer include:
- Headless browsing: Puppeteer can control a headless version of Chrome or Chromium, which means that the browser can run without a graphical user interface (GUI). This enables it to perform background tasks and automation efficiently.
- Automated tasks: Puppeteer allows you to simulate user interactions, such as browsing pages, clicking buttons, filling out forms, etc. It can also automatically access web pages and extract data, which is suitable for data collection and analysis.
- Page manipulation: You can modify web page content by injecting JavaScript code, changing styles, and manipulating DOM (Document Object Model).
- Screenshot and PDF generation: Puppeteer can screenshot or export web pages to PDF format. This is very useful for creating visual reports and documents.
- Network monitoring: Puppeteer can intercept and modify network requests and responses for debugging or testing different network scenarios.
- Performance analysis: Get performance indicators such as page loading time and resource usage to help optimize web page performance.
- Web Scraping: Puppeteer is often used for web scraping tasks because it can interact with websites like real users, thus extracting data from dynamic and JavaScript-heavy pages.
- Testing: Puppeteer is often used to automate end-to-end testing of web applications. It can simulate user behavior and interactions to ensure that your web application runs as expected.
- Headless and Head Mode: It can be run in headless mode or debugged in head mode, which is convenient for development and testing.
What Does Headless Mean in the Puppeteer?
Puppeteer is a Node.js library for controlling Chrome or Chromium browsers, primarily for tasks such as automated testing, web scraping, and generating PDFs. The "headless" in Puppeteer refers to a browser instance that can run without a user interface.
In other words, the browser runs in the background and does not display a window with which you can interact visually. Instead, it performs tasks programmatically and can be controlled by scripts or code.
Puppeteer allows you to control a regular browser instance with a visible GUI and a headless browser instance. Headless mode is particularly useful for tasks such as web scraping, automated testing, and generating screenshots or PDFs, as it allows these tasks to be performed efficiently without the browser window being displayed.
Some benefits of using Puppeteer headless mode:
- Performance: Browsers in headless mode typically run faster than graphical browsers because they do not have to render and display the visual elements of a web page.
- Resource efficiency: Since no graphical user interface is displayed, headless browsers take up less memory and CPU resources than running a full browser with a GUI, making them suitable for running on a server or in a CI/CD environment.
- Background tasks: Headless browsers are well suited for automated tasks that do not require user interaction or visual feedback, such as web scraping and automated testing.
- Server-side operations: Headless browsers can be used in server environments to automate tasks without a physical display.
- Automation: Scripts can be written to simulate user browser operations such as clicks, input, screenshots, etc. without manual intervention.
Headless browsers are particularly powerful for tasks that require automated interaction with websites, data extraction, testing, and other operations that do not require visual rendering.
Do you have any wonderful ideas or doubts about web scraping and Browserless?
Let's see what other developers are sharing on Discord and Telegram!
How to do headless browser testing with Puppeteer and Browserless?
Let's figure it out in the following content!
Running Headless Testing in Puppeteer with Browserless
Initialize the environment
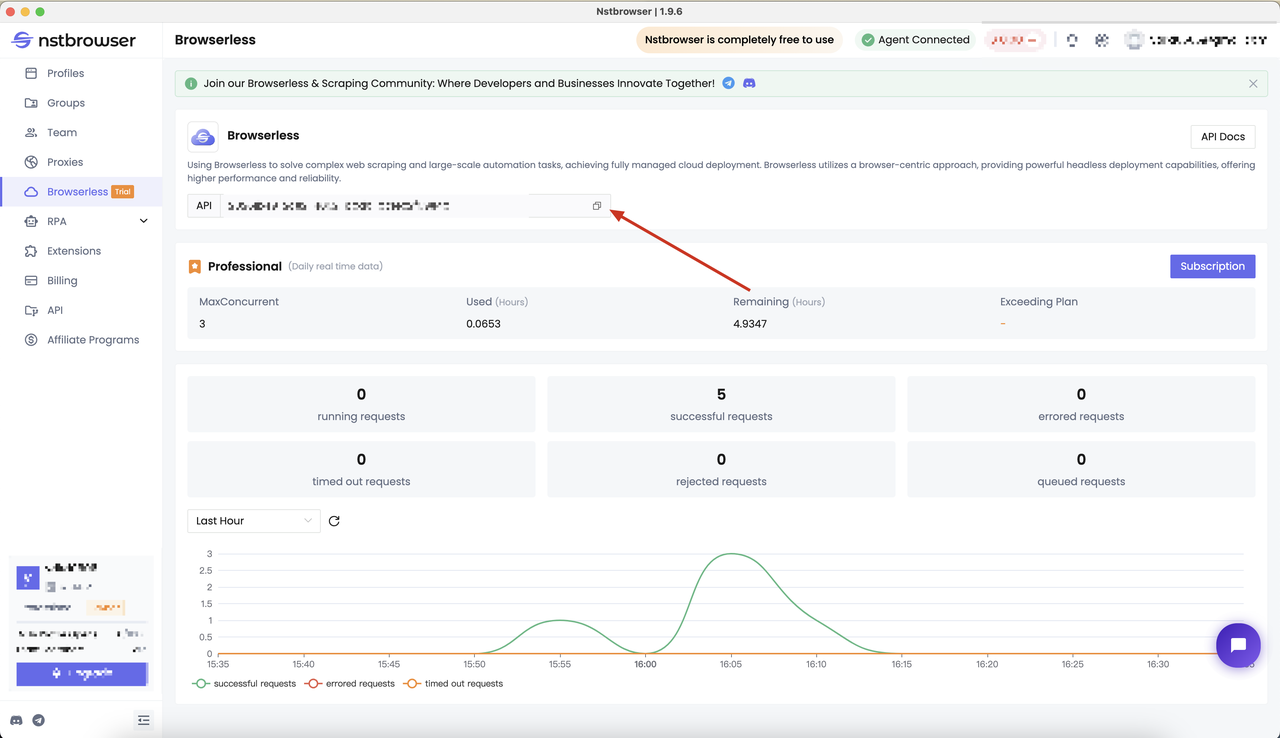
Before testing, we need to have a Browserless service. Browserless can help us solve complex web crawling and large-scale automation tasks. With cloud deployment of fully managed achievement, Browserless has a more powerful function.
Browserless adopts a browser-centric strategy, provides powerful headless deployment capabilities, and offers higher performance and reliability. Please click here to learn more about the configuration of the Browserless service.
- We need to get the API KEY of Nstbrowser first. You can go to the Browserless menu page of the Nstbrowser client, or just click here to access:
Determine the test case target
After completing the environment initialization, we need to further determine the target of our test.
We will just learn an example of how to use Puppeteer with Browserless without specific web pages. Please specify the sample to your target websites and requirements.
Here, let's use Puppeteer to get the title of the page and create a screenshot. After that, we will combine it with Jest to write test cases.
The following are our main test contents:
- Whether the title of the page is the target title
- Whether the screenshot contains the target element
Project initialization
Next, please follow the steps below to install Puppeteer and run the test script:
Step 1: Create a new folder in Vs code
Step 2: Open the Vs code terminal and run the following commands to install related dependencies
SQL
npm init -y
pnpm add jest jest-html-reporter puppeteer-core
Step 3: Finish related files
- Create the
jest.config.jsconfiguration file to perform the related configuration:
JavaScript
module.exports = {
  testTimeout: 10000, // 10 seconds
  reporters: [
    'default',
    [
      'jest-html-reporter',
      {
        pageTitle: 'Test Report',
        outputPath: './test-report.html',
        includeFailureMsg: true,
        includeConsoleLog: true,
      },
    ],
  ],
};- Create the
__tests__/puppeteer.spec.jstest script
To launch the browser, you need to pass in the relevant configuration (for complete configuration, refer to LaunchNewBrowser
JavaScript
const puppeteer = require('puppeteer-core');

describe('My First Puppeteer Test', () => {
  it('should load the page and check the title', async () => {
    const browserWSEndpoint = await launchAndConnectToBrowser();
    const browser = await puppeteer.connect({
      browserWSEndpoint: browserWSEndpoint,
      defaultViewport: null,
    });
    const page = await browser.newPage();
    await page.goto('https://example.com');

    const title = await page.title();
    expect(title).toBe('Example Domain');

    await browser.close();
  });

  // take a screenshot of the page
  it('should take a screenshot of the page', async () => {
    const browserWSEndpoint = await launchAndConnectToBrowser();
    const browser = await puppeteer.connect({
      browserWSEndpoint: browserWSEndpoint,
      defaultViewport: null,
    });
    const page = await browser.newPage();
    await page.goto('https://example.com');

    await page.screenshot({ path: 'example.png' });

    await browser.close();
  });
});

async function launchAndConnectToBrowser() {
  const token = ''; // your api token from nstbrowser
  const config = {
    proxy:
      '', // required; input format: schema://user:password@host:port eg: http://user:password@localhost:8080
    // platform: 'windows', // support: windows, mac, linux
    // kernel: 'chromium', // only support: chromium
    // kernelMilestone: '128', // support: 128
    // args: {
    //     "--proxy-bypass-list": "detect.nstbrowser.io"
    // }, // browser args
    // fingerprint: {
    //     userAgent: 'Mozilla/5.0 (Windows NT 10.0; Win64; x64) AppleWebKit/537.36 (KHTML, like Gecko) Chrome/128.0.6613.85 Safari/537.36', // userAgent supportted since v0.15.0
    // },
  };
  const query = new URLSearchParams({
    token: token, // required
    config: JSON.stringify(config),
  });

  const browserWSEndpoint = `ws://less.nstbrowser.io/connect?${query.toString()}`;
  return browserWSEndpoint;
}
Run the project
Now we just need to open the console and run the following script command:
Bash
npx jest --detectOpenHandlesThe commands here can be mainly broken down into:
- Use the
npxcommand to execute the jest command. - The jest will find the
jest.config.jsconfiguration file of the current project and obtain basic configuration information. - According to the content of the configuration file, find the matching test file in the current project directory and start executing.
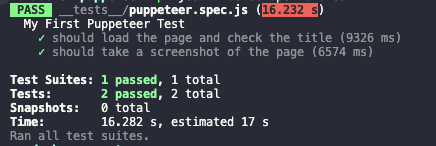
Result output
After executing the above command, we will see the following output. Here, each important result of the test execution process will be output, and it shows us that our test case has passed.
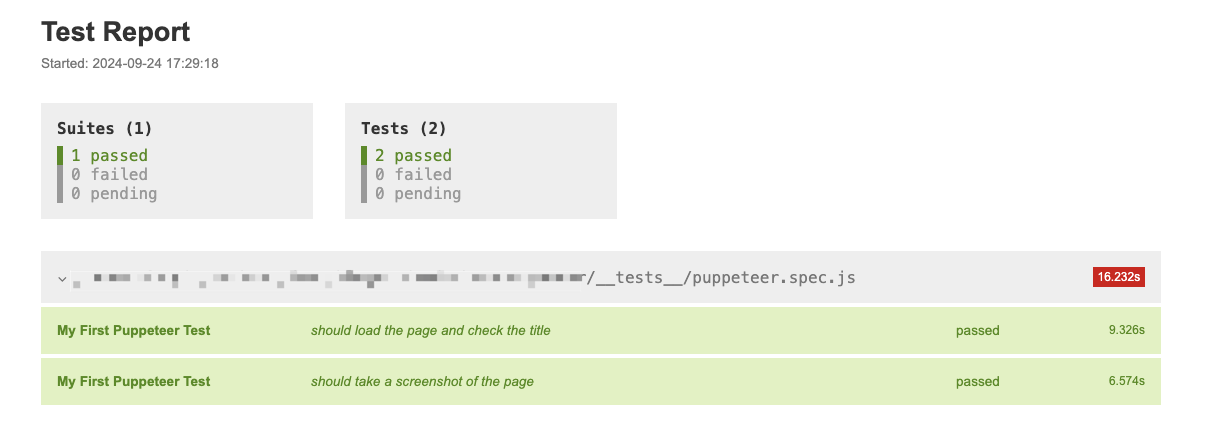
At the same time, we can open the test-report.html file to view the specific report generated:
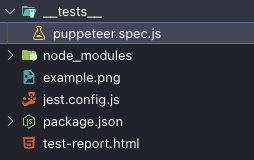
The file structure of the project is as follows. We can also see the output screenshot file content, which means that our test case has been completely passed.
Benefits of Puppeteer Headless Testing
- Headless browser testing is faster compared to real browsers as it consumes fewer system resources.
- It improves test execution performance as it usually executes 2 times faster than real browser testing.
- It is perfect for web scraping. Suppose you need to fetch a lot of data (sports data, stock data, etc.) from a web page through Puppeteer automation and store it in any Excel or database. In this case, Puppeteer headless mode is best as there is no need to launch a real browser to verify the UI and the main focus is on fetching data.
- It helps in emulating multiple browsers on a single system without resource overhead.
- It is suitable for parallel testing. UI-based browsers consume a lot of memory and resources. So, Puppeteer headless browsers are a better choice here.
7 Best Practices Using Puppeteer Headless
- Manage Resource Usage: Since Puppeteer in headless mode runs without a graphical interface, it's faster and uses fewer resources. However, it's still essential to manage memory and CPU usage, especially when running multiple instances. Utilize Puppeteer's built-in features like page pooling and efficient tab management to reduce resource consumption.
- Handle Timeouts and Retries: Web scraping or automated tasks may encounter network delays or timeouts. Setting proper timeout values and implementing retry logic ensures your scripts can handle intermittent failures without crashing.
- Wait for Elements Wisely: Always wait for the required elements to load before performing actions. Instead of using static delays (e.g.,
page.waitForTimeout), prefer waiting for specific events or elements (page.waitForSelector), which makes your automation more efficient and resilient to varying load times. - Use Incognito Contexts for Isolation: To avoid data leakage and ensure each test or scrape runs in a clean environment, use incognito contexts (
browser.createIncognitoBrowserContext). This prevents cached data, cookies, or local storage from affecting subsequent sessions. - Leverage Headless Detection Bypassing: Many websites detect headless browsers and may block or serve limited content to these requests. Using techniques like modifying browser flags, overriding the user agent, and spoofing web features (e.g.,
navigator.webdriverremoval) can help bypass headless detection. - Monitor Performance and Logs: Use Puppeteer's performance and console logging tools to debug and optimize scripts. Monitoring page performance metrics and handling browser logs can help diagnose bottlenecks and other issues.
- Optimize for Scalability: If you plan to run Puppeteer on a large scale, consider containerization with Docker, using load balancers, and running multiple browser instances in parallel. These steps help ensure scalability and reduce downtime in production environments.
The Bottom Lines
Puppeteer headless browser makes everything easy. In this blog, we aim to share with you:
- the powerful functions
- and efficient steps to use Puppeteer headless mode with Browserless
The Browserless of Nstbrowser simplifies the configuration and operation of Puppeteer. Just like before, it's time to reach out: how Browserless works with Playwright and Puppeteer!
More


