Proxy
How to Use Nstbrowser with Astro Geo-Targeted Proxies
How to use the antidetect Nstbrowser solution with the Astro data gathering infrastructure of geo targeted proxies spread across 100+ countries for private sessions
Jul 22, 2024Robin Brown
Combining Nstbrowser with Astro’s Geo-Targeted Proxies
Astro, an infrastructure of geo-targeted proxies from over 100 countries, is notable for its dependability, smart rotation, effective support team, adherence to business ethics, and performance. The pool of available IPs encompasses residential, datacenter, and mobile network proxies. This combo of properties makes Astro an optimal candidate to explore when protected web surfing activities lie ahead.
Focusing on affordability and universal coverage, Astro’s geo-targeted proxies come within two pricing approaches: pre-paid packages and Pay-as-You-Go opportunities. Astro reveals such prospects as:
- SOCKS5 and HTTP(S) protocols that are easily interchangeable during online sessions.
- Up to 250 connections per a single port.
- Geo-targeted proxies stemming from desirable countries, cities, providers, etc.
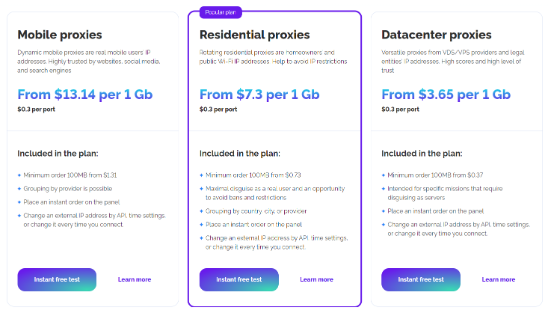
- Residential proxies start at 7.3 per 1 GB while mobile network proxies cost 13.14. Datacenter options stand at $3.65 per 1 GB.
- VPN-readiness.
- Usable dashboard for straightforward work management.
Astro takes pride in how simple it is to combine their geo-targeted proxies with antidetect web surfing software. Here is the path to follow with Nstbrowser.
Phase 1. Setting a Fresh Profile for Browsing
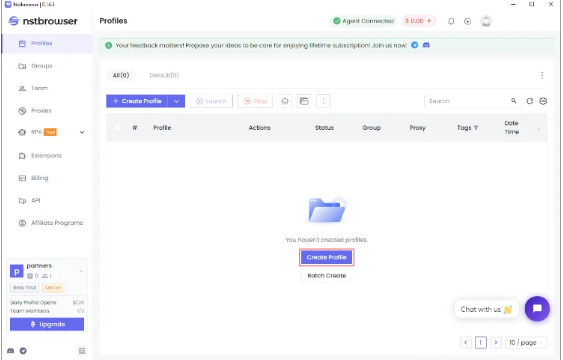
Start a new user profile in the Nstbrowser solution for safe and private browsing experiences. Clicking on "Create profile" will take you to the profile generation settings.

Phase 2. Pick Astro’s Geo-Targeted Proxies
Astro has 3 IP types: residential, datacenter, and mobile network proxies. Decide on the favored class and fine-tune its settings through the Astro dashboard.

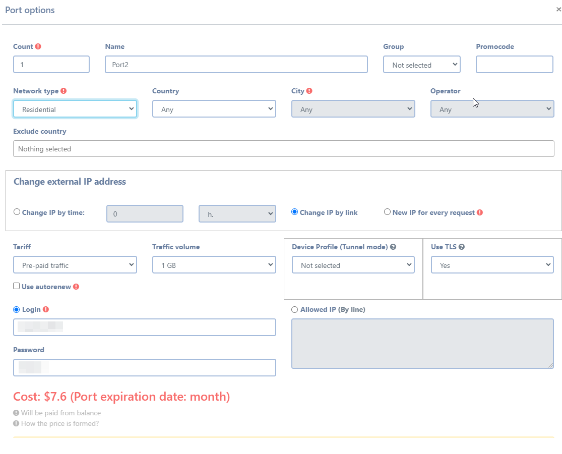
Once signed up and viewing your personal dashboard, click on “Add port”. Today’s guide opts for residential proxies. The menu below illustrates how to specify settings accordingly.

Dashboard Section with Geo-Targeted Proxy Settings

After configs are left behind, proceed with copying the IP attributes from the formatted listing area.

Vital Proxy Properties for Copying
Phase 3. Submit Geo-Targeted Proxy Properties
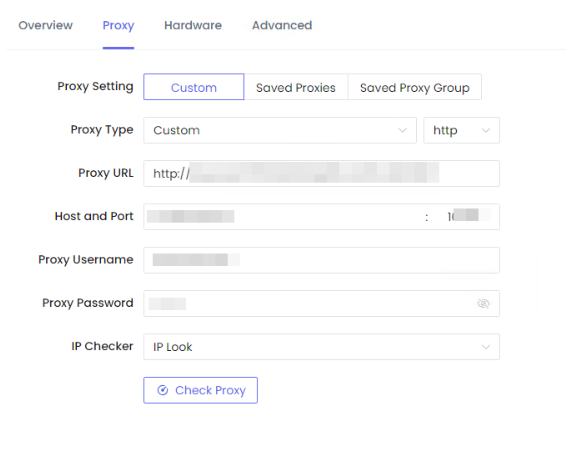
Go to the "Proxy" tab in Nstbrowser. Choose "Custom" immediately under proxy settings. In this section, enter your geo-targeted proxy details from Astro. Just paste the proxy info from the Astro dashboard into the "Proxy URL" field. Then select your preferred protocol and run a test. Finalize the flow by clicking on "Create profile".

Entering IP Details into Nstbrowser
Phase 4. Activating One’s Profile
The final stage has come. To launch your freshly generated profile, simply click on "Play". Then Nstbrowser downloads the required kernel enabling end-users to begin browsing confidentially under reliable protection.

Activate New Profile
More


